1. CountDownLatch latch 的中文意思是门栓、栅栏 ,CountDownLatch 基于 AQS 的共享模式的使用
1.1 使用例子
假设我们有 N ( N > 0 ) 个任务,那么我们会用 N 来初始化一个 CountDownLatch,然后将这个 latch 的引用传递到各个线程中,在每个线程完成了任务后,调用 latch.countDown() 代表完成了一个任务。
调用 latch.await() 的方法的线程会阻塞,直到所有的任务完成。
1
2
3
4
5
6
7
8
9
10
11
12
13
14
15
16
17
18
19
20
21
22
23
24
25
26
27
28
29
30
31
32
33
34
class Driver { void main () throws InterruptedException { CountDownLatch doneSignal = new CountDownLatch (N); Executor e = Executors.newFixedThreadPool(8 ); for (int i = 0 ; i < N; ++i) e.execute(new WorkerRunnable (doneSignal, i)); doneSignal.await(); } } class WorkerRunnable implements Runnable { private final CountDownLatch doneSignal; private final int i; WorkerRunnable(CountDownLatch doneSignal, int i) { this .doneSignal = doneSignal; this .i = i; } public void run () { try { doWork(i); doneSignal.countDown(); } catch (InterruptedException ex) { } } void doWork () { ...} }
所以说 CountDownLatch 非常实用,我们常常会将一个比较大的任务进行拆分,然后开启多个线程来执行,等所有线程都执行完了以后,再往下执行其他操作。这里例子中,只有 main 线程调用了 await 方法 。
另一个例子用了两个 CountDownLatch:
1
2
3
4
5
6
7
8
9
10
11
12
13
14
15
16
17
18
19
20
21
22
23
24
25
26
27
28
29
30
31
32
33
34
35
36
37
38
39
40
class Driver { void main () throws InterruptedException { CountDownLatch startSignal = new CountDownLatch (1 ); CountDownLatch doneSignal = new CountDownLatch (N); for (int i = 0 ; i < N; ++i) new Thread (new Worker (startSignal, doneSignal)).start(); doSomethingElse(); startSignal.countDown(); doSomethingElse(); doneSignal.await(); } } class Worker implements Runnable { private final CountDownLatch startSignal; private final CountDownLatch doneSignal; Worker(CountDownLatch startSignal, CountDownLatch doneSignal) { this .startSignal = startSignal; this .doneSignal = doneSignal; } public void run () { try { startSignal.await(); doWork(); doneSignal.countDown(); } catch (InterruptedException ex) { } } void doWork () { ...} }
这个例子中,doneSignal 同第一个例子的使用,我们说说这里的 startSignal。N 个新开启的线程都调用了startSignal.await() 进行阻塞等待,它们阻塞在栅栏 上,只有当条件满足的时候(startSignal.countDown()),它们才能同时通过这个栅栏,目的是让所有的线程站在一个起跑线上。
如果始终只有一个线程调用 await 方法等待任务完成,那么 CountDownLatch 就会简单很多,所以之后的源码分析读者一定要在脑海中构建出这么一个场景:有 m 个线程是做任务的,有 n 个线程在某个栅栏上等待这 m 个线程做完任务,直到所有 m 个任务完成后,n 个线程同时通过栅栏。
1.2 源码分析 构造方法,需要传入一个不小于 0 的整数:
1
2
3
4
5
6
7
8
9
10
11
12
public CountDownLatch (int count) { if (count < 0 ) throw new IllegalArgumentException ("count < 0" ); this .sync = new Sync (count); } private static final class Sync extends AbstractQueuedSynchronizer { Sync(int count) { setState(count); } ... }
分析套路:AQS 里面的 state 是一个整数值,所有调用了 await 方法的等待线程会挂起,然后有其他一些线程会做 state = state - 1 操作,当 state 减到 0 的同时,那个将 state 减为 0 的线程会负责唤醒 所有调用了 await 方法的线程。
对于 CountDownLatch,我们仅仅需要关心两个方法,一个是 countDown() 方法,另一个是 await() 方法。
countDown() 方法每次调用都会将 state 减 1,直到 state 的值为 0;而 await 是一个阻塞方法,当 state 减为 0 的时候,await 方法才会返回。await 可以被多个线程调用,读者这个时候脑子里要有个图:所有调用了 await 方法的线程阻塞在 AQS 的阻塞队列中,等待条件满足(state == 0),将线程从队列中一个个唤醒过来。
我们用以下程序来分析源码,t1 和 t2 负责调用 countDown() 方法,t3 和 t4 调用 await 方法阻塞:
1
2
3
4
5
6
7
8
9
10
11
12
13
14
15
16
17
18
19
20
21
22
23
24
25
26
27
28
29
30
31
32
33
34
35
36
37
38
39
40
41
42
43
44
45
46
47
48
49
50
51
52
53
54
55
56
57
58
59
60
61
62
63
64
public class CountDownLatchDemo { public static void main (String[] args) { CountDownLatch latch = new CountDownLatch (2 ); Thread t1 = new Thread (new Runnable () { @Override public void run () { try { Thread.sleep(5000 ); } catch (InterruptedException ignore) { } latch.countDown(); } }, "t1" ); Thread t2 = new Thread (new Runnable () { @Override public void run () { try { Thread.sleep(10000 ); } catch (InterruptedException ignore) { } latch.countDown(); } }, "t2" ); t1.start(); t2.start(); Thread t3 = new Thread (new Runnable () { @Override public void run () { try { latch.await(); System.out.println("线程 t3 从 await 中返回了" ); } catch (InterruptedException e) { System.out.println("线程 t3 await 被中断" ); Thread.currentThread().interrupt(); } } }, "t3" ); Thread t4 = new Thread (new Runnable () { @Override public void run () { try { latch.await(); System.out.println("线程 t4 从 await 中返回了" ); } catch (InterruptedException e) { System.out.println("线程 t4 await 被中断" ); Thread.currentThread().interrupt(); } } }, "t4" ); t3.start(); t4.start(); } }
上述程序,大概在过了 10 秒左右的时候,会输出:
1
2
线程 t3 从 await 中返回了 线程 t4 从 await 中返回了
这两条输出,顺序不是绝对的
按照流程一步一步走:先 await 等待,然后被唤醒,await 方法返回。
首先 ,我们来看 await() 方法,它代表线程阻塞,等待 state 的值减为 0。
1
2
3
4
5
6
7
8
9
10
11
12
13
14
15
16
17
18
public void await () throws InterruptedException { sync.acquireSharedInterruptibly(1 ); } public final void acquireSharedInterruptibly (int arg) throws InterruptedException { if (Thread.interrupted()) throw new InterruptedException (); if (tryAcquireShared(arg) < 0 ) doAcquireSharedInterruptibly(arg); } protected int tryAcquireShared (int acquires) { return (getState() == 0 ) ? 1 : -1 ; }
从方法名我们就可以看出,这个方法是获取共享锁,并且此方法是可中断的(中断的时候抛出 InterruptedException 退出这个方法)。
1
2
3
4
5
6
7
8
9
10
11
12
13
14
15
16
17
18
19
20
21
22
23
24
25
26
27
28
private void doAcquireSharedInterruptibly (int arg) throws InterruptedException { final Node node = addWaiter(Node.SHARED); boolean failed = true ; try { for (;;) { final Node p = node.predecessor(); if (p == head) { int r = tryAcquireShared(arg); if (r >= 0 ) { setHeadAndPropagate(node, r); p.next = null ; failed = false ; return ; } } if (shouldParkAfterFailedAcquire(p, node) && parkAndCheckInterrupt()) throw new InterruptedException (); } } finally { if (failed) cancelAcquire(node); } }
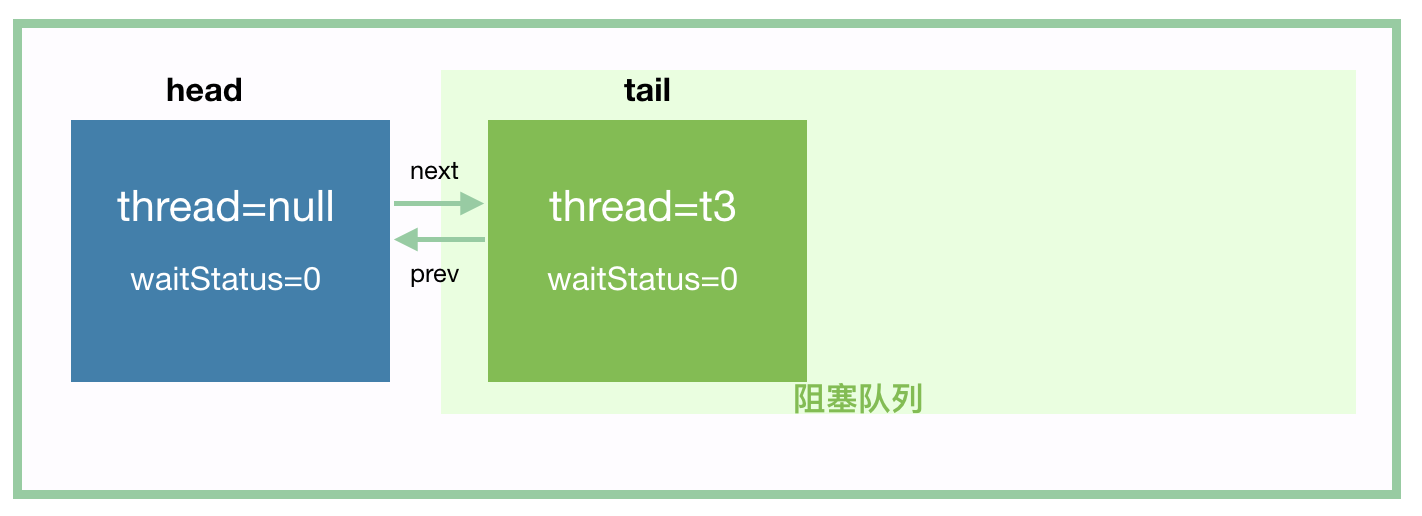
我们来仔细分析这个方法,线程 t3 经过第 1 步 addWaiter 入队以后,我们应该可以得到这个:
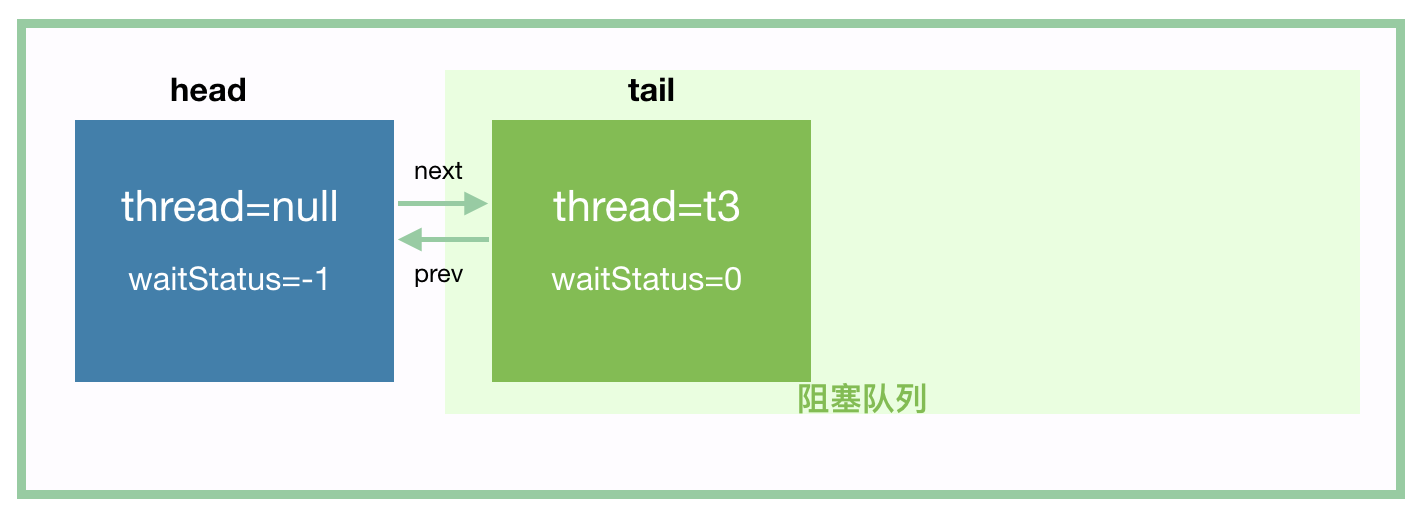
由于 tryAcquireShared 这个方法会返回 -1,所以 if (r >= 0) 这个分支不会进去。到 shouldParkAfterFailedAcquire 的时候,t3 将 head 的 waitStatus 值设置为 -1,如下:
然后进入到 parkAndCheckInterrupt 的时候,t3 挂起。
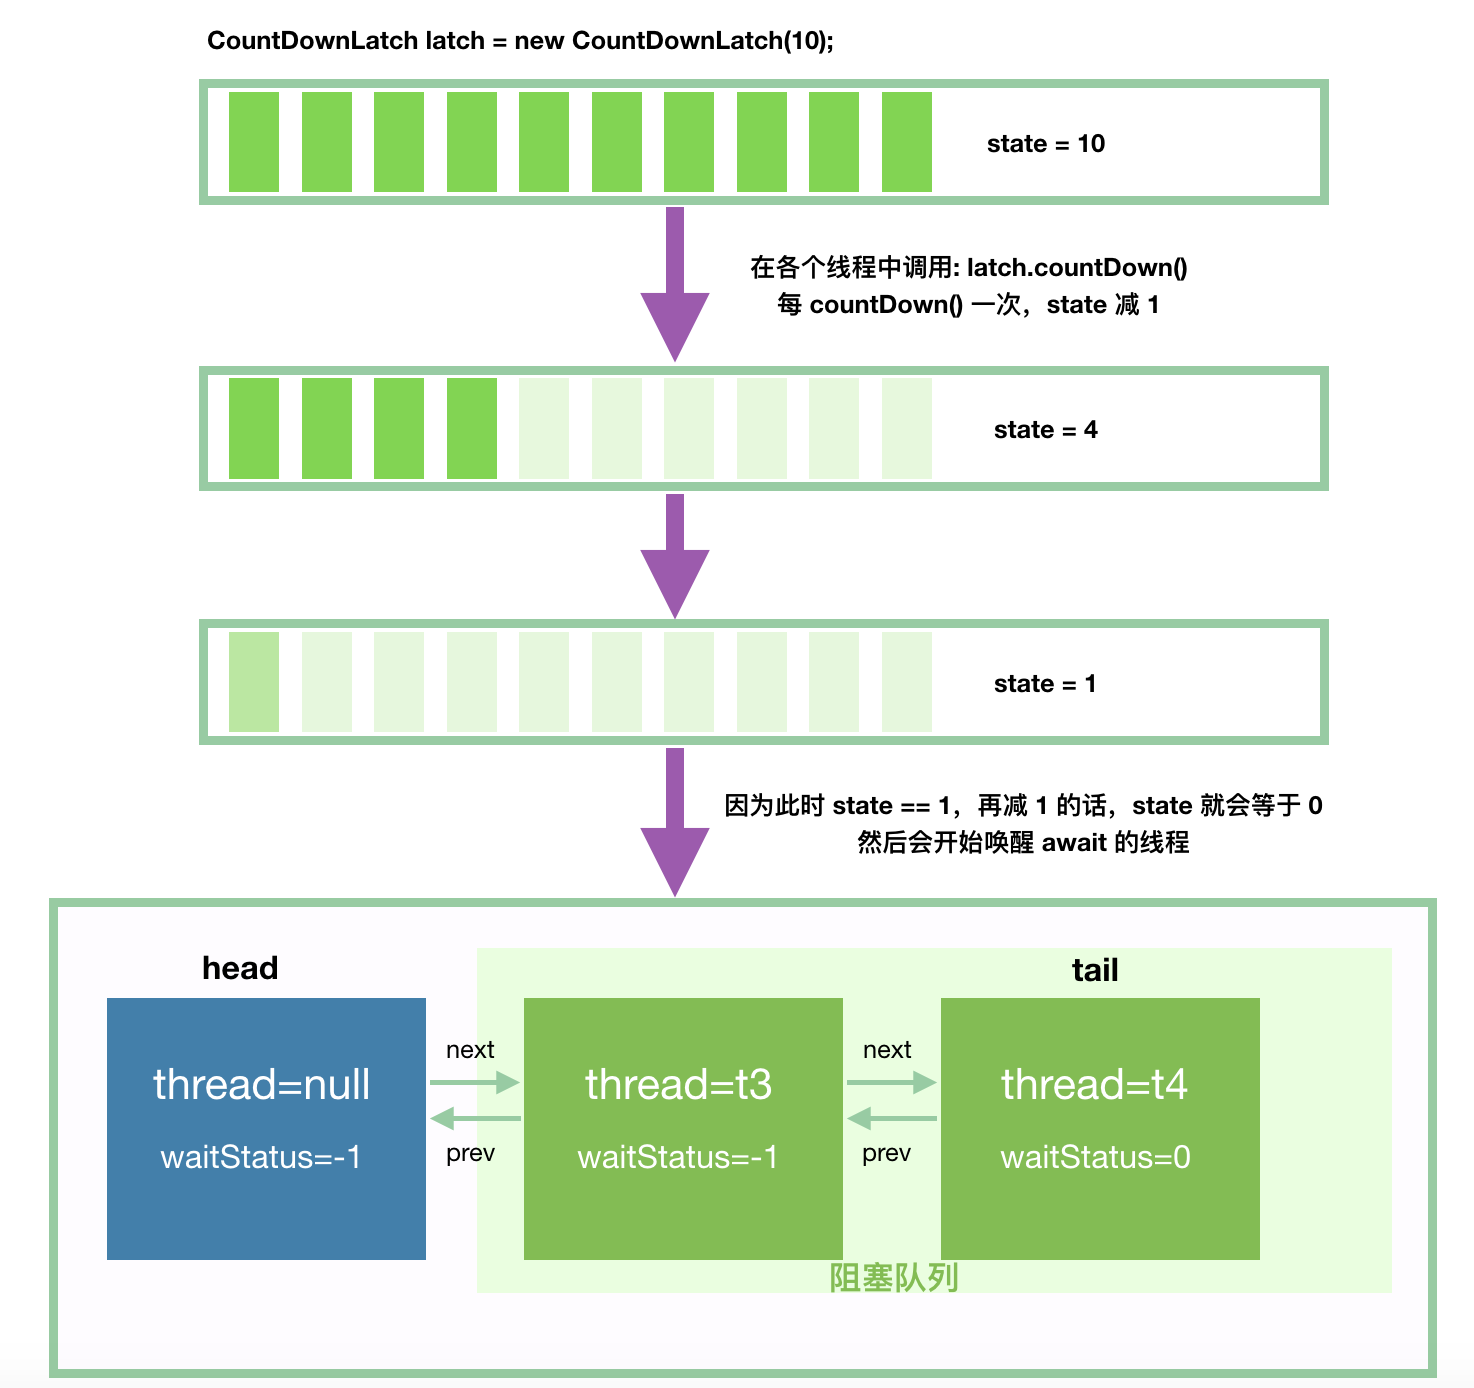
我们再分析 t4 入队,t4 会将前驱节点 t3 所在节点的 waitStatus 设置为 -1,t4 入队后,应该是这样的:
然后,t4 也挂起。接下来,t3 和 t4 就等待唤醒了。
接下来,我们来看唤醒的流程。为了让下面的示意图更丰富些,我们假设用 10 初始化 CountDownLatch。
当然,我们的例子中,其实没有 10 个线程,只有 2 个线程 t1 和 t2,只是为了让图好看些罢了。
我们再一步步看具体的流程。首先,我们看 countDown() 方法:
1
2
3
4
5
6
7
8
9
10
11
12
13
14
15
16
17
18
19
20
21
22
23
24
25
public void countDown () { sync.releaseShared(1 ); } public final boolean releaseShared (int arg) { if (tryReleaseShared(arg)) { doReleaseShared(); return true ; } return false ; } protected boolean tryReleaseShared (int releases) { for (;;) { int c = getState(); if (c == 0 ) return false ; int nextc = c-1 ; if (compareAndSetState(c, nextc)) return nextc == 0 ; } }
countDown 方法就是每次调用都将 state 值减 1,如果 state 减到 0 了,那么就调用下面的方法进行唤醒阻塞队列中的线程:
1 2 3 4 5 6 7 8 9 10 11 12 13 14 15 16 17 18 19 20 21 22 23 24 private void doReleaseShared () { for (;;) { Node h = head; if (h != null && h != tail) { int ws = h.waitStatus; if (ws == Node.SIGNAL) { if (!compareAndSetWaitStatus(h, Node.SIGNAL, 0 )) continue ; unparkSuccessor(h); } else if (ws == 0 && !compareAndSetWaitStatus(h, 0 , Node.PROPAGATE)) continue ; } if (h == head) break ; } }
一旦 t3 被唤醒后,我们继续回到 await 的这段代码,parkAndCheckInterrupt 返回,我们先不考虑中断的情况:
1
2
3
4
5
6
7
8
9
10
11
12
13
14
15
16
17
18
19
20
21
22
23
24
25
26
private void doAcquireSharedInterruptibly (int arg) throws InterruptedException { final Node node = addWaiter(Node.SHARED); boolean failed = true ; try { for (;;) { final Node p = node.predecessor(); if (p == head) { int r = tryAcquireShared(arg); if (r >= 0 ) { setHeadAndPropagate(node, r); p.next = null ; failed = false ; return ; } } if (shouldParkAfterFailedAcquire(p, node) && parkAndCheckInterrupt()) throw new InterruptedException (); } } finally { if (failed) cancelAcquire(node); } }
接下来,t3 会进到 setHeadAndPropagate(node, r) 这个方法,先把 head 给占了,然后唤醒队列中其他的线程:
1
2
3
4
5
6
7
8
9
10
11
12
13
14
private void setHeadAndPropagate (Node node, int propagate) { Node h = head; setHead(node); if (propagate > 0 || h == null || h.waitStatus < 0 || (h = head) == null || h.waitStatus < 0 ) { Node s = node.next; if (s == null || s.isShared()) doReleaseShared(); } }
又回到这个方法了,那么接下来,我们好好分析 doReleaseShared 这个方法,我们根据流程,头节点 head 此时是 t3 节点了:
1 2 3 4 5 6 7 8 9 10 11 12 13 14 15 16 17 18 19 20 21 22 23 24 25 26 27 28 29 30 31 private void doReleaseShared () { for (;;) { Node h = head; if (h != null && h != tail) { int ws = h.waitStatus; if (ws == Node.SIGNAL) { if (!compareAndSetWaitStatus(h, Node.SIGNAL, 0 )) continue ; unparkSuccessor(h); } else if (ws == 0 && !compareAndSetWaitStatus(h, 0 , Node.PROPAGATE)) continue ; } if (h == head) break ; } }
我们分析下最后一个 if 语句,然后才能解释第一个 CAS 为什么可能会失败:
h == head:说明头节点还没有被刚刚用 unparkSuccessor 唤醒的线程(这里可以理解为 t4)占有,此时 break 退出循环。
h != head:头节点被刚刚唤醒的线程(这里可以理解为 t4)占有,那么这里重新进入下一轮循环,唤醒下一个节点(这里是 t4 )。我们知道,等到 t4 被唤醒后,其实是会主动唤醒 t5、t6、t7…,那为什么这里要进行下一个循环来唤醒 t5 呢?我觉得是出于吞吐量的考虑。
满足上面的 2 的场景,那么我们就能知道为什么上面的 CAS 操作 compareAndSetWaitStatus(h, Node.SIGNAL, 0) 会失败了?
因为当前进行 for 循环的线程到这里的时候,可能刚刚唤醒的线程 t4 也刚刚好到这里了,那么就有可能 CAS 失败了。
for 循环第一轮的时候会唤醒 t4,t4 醒后会将自己设置为头节点,如果在 t4 设置头节点后,for 循环才跑到 if (h == head),那么此时会返回 false,for 循环会进入下一轮。t4 唤醒后也会进入到这个方法里面,那么 for 循环第二轮和 t4 就有可能在这个 CAS 相遇,那么就只会有一个成功了。
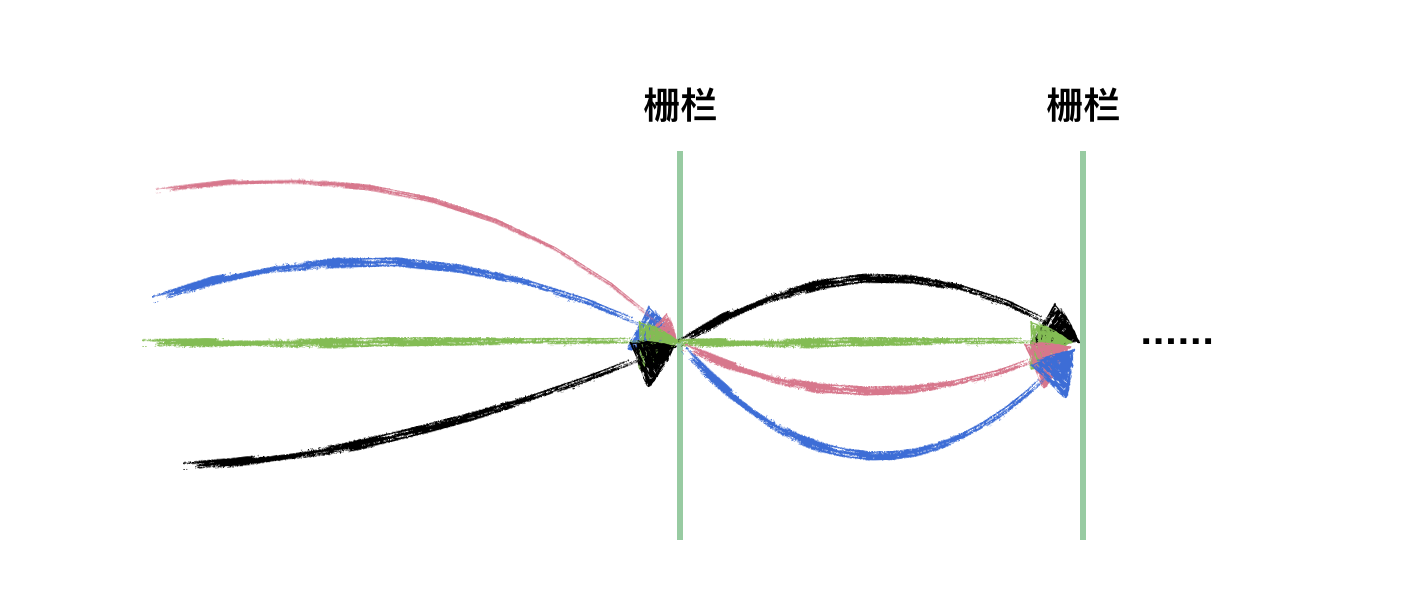
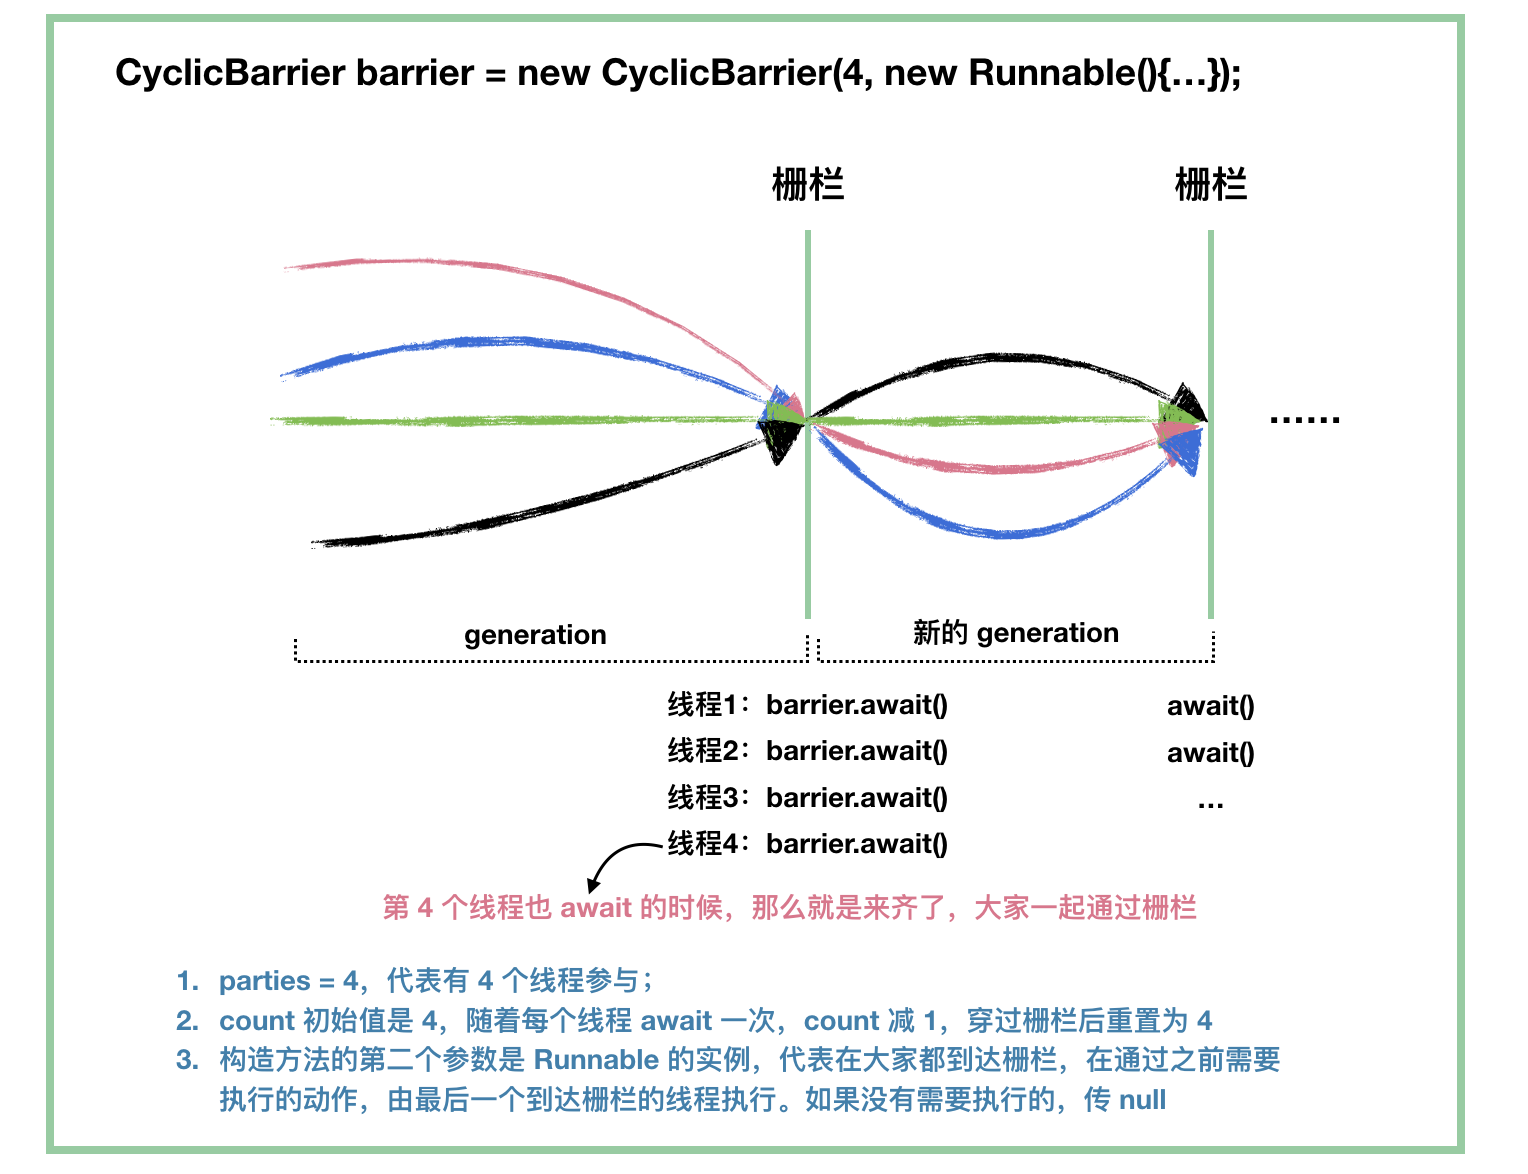
2. CyclicBarrier “可重复使用的 栅栏”或“周期性的栅栏”,它是 ReentrantLock 和 Condition 的组合使用。如下示意图,CyclicBarrier 和 CountDownLatch 是不是很像,只是 CyclicBarrier 可以有不止一个栅栏,因为它的栅栏(Barrier)可以重复使用(Cyclic)。CyclicBarrier 基于 Condition 来实现。
CyclicBarrier 里面的一些概念、基本使用流程:
大家先把图看完,然后我们开始源码分析:
1
2
3
4
5
6
7
8
9
10
11
12
13
14
15
16
17
18
19
20
21
22
23
24
25
26
27
28
29
30
31
32
33
34
35
36
public class CyclicBarrier { private static class Generation { boolean broken = false ; } private final ReentrantLock lock = new ReentrantLock (); private final Condition trip = lock.newCondition(); private final int parties; private final Runnable barrierCommand; private Generation generation = new Generation (); private int count; public CyclicBarrier (int parties, Runnable barrierAction) { if (parties <= 0 ) throw new IllegalArgumentException (); this .parties = parties; this .count = parties; this .barrierCommand = barrierAction; } public CyclicBarrier (int parties) { this (parties, null ); }
首先,先看怎么开启新的一代:
1 2 3 4 5 6 7 8 9 private void nextGeneration () { trip.signalAll(); count = parties; generation = new Generation (); }
看看怎么打破一个栅栏:
1
2
3
4
5
6
7
8
private void breakBarrier () { generation.broken = true ; count = parties; trip.signalAll(); }
这两个方法之后用得到,现在开始分析最重要的等待通过栅栏方法 await 方法:
1 2 3 4 5 6 7 8 9 10 11 12 13 14 15 public int await () throws InterruptedException, BrokenBarrierException { try { return dowait(false , 0L ); } catch (TimeoutException toe) { throw new Error (toe); } } public int await (long timeout, TimeUnit unit) throws InterruptedException, BrokenBarrierException, TimeoutException { return dowait(true , unit.toNanos(timeout)); }
继续往里看:
1
2
3
4
5
6
7
8
9
10
11
12
13
14
15
16
17
18
19
20
21
22
23
24
25
26
27
28
29
30
31
32
33
34
35
36
37
38
39
40
41
42
43
44
45
46
47
48
49
50
51
52
53
54
55
56
57
58
59
60
61
62
63
64
65
66
67
68
69
70
71
72
73
74
75
76
77
78
79
80
81
82
83
84
85
86
87
88
89
90
91
private int dowait (boolean timed, long nanos) throws InterruptedException, BrokenBarrierException, TimeoutException { final ReentrantLock lock = this .lock; lock.lock(); try { final Generation g = generation; if (g.broken) throw new BrokenBarrierException (); if (Thread.interrupted()) { breakBarrier(); throw new InterruptedException (); } int index = --count; if (index == 0 ) { boolean ranAction = false ; try { final Runnable command = barrierCommand; if (command != null ) command.run(); ranAction = true ; nextGeneration(); return 0 ; } finally { if (!ranAction) breakBarrier(); } } for (;;) { try { if (!timed) trip.await(); else if (nanos > 0L ) nanos = trip.awaitNanos(nanos); } catch (InterruptedException ie) { if (g == generation && ! g.broken) { breakBarrier(); throw ie; } else { Thread.currentThread().interrupt(); } } if (g.broken) throw new BrokenBarrierException (); if (g != generation) return index; if (timed && nanos <= 0L ) { breakBarrier(); throw new TimeoutException (); } } } finally { lock.unlock(); } }
下面开始收尾工作。
首先,我们看看怎么得到有多少个线程到了栅栏上,处于等待状态:
1
2
3
4
5
6
7
8
9
public int getNumberWaiting () { final ReentrantLock lock = this .lock; lock.lock(); try { return parties - count; } finally { lock.unlock(); } }
判断一个栅栏是否被打破了,这个很简单,直接看 broken 的值即可:
1
2
3
4
5
6
7
8
9
public boolean isBroken () { final ReentrantLock lock = this .lock; lock.lock(); try { return generation.broken; } finally { lock.unlock(); } }
前面我们在说 await 的时候也几乎说清楚了,什么时候栅栏会被打破,总结如下:
中断,我们说了,如果某个等待的线程发生了中断,那么会打破栅栏,同时抛出 InterruptedException 异常;
超时,打破栅栏,同时抛出 TimeoutException 异常;
指定执行的操作抛出了异常,这个我们前面也说过。
最后,我们来看看怎么重置一个栅栏:
1
2
3
4
5
6
7
8
9
10
public void reset () { final ReentrantLock lock = this .lock; lock.lock(); try { breakBarrier(); nextGeneration(); } finally { lock.unlock(); } }
设想一下,如果初始化时,指定了线程 parties = 4,前面有 3 个线程调用了 await 等待,在第 4 个线程调用 await 之前,我们调用 reset 方法,那么会发生什么?
首先,打破栅栏,那意味着所有等待的线程(3个等待的线程)会唤醒,await 方法会通过抛出 BrokenBarrierException 异常返回。然后开启新的一代,重置了 count 和 generation,相当于一切归零了。
3. Semaphore 有了 CountDownLatch 的基础后,分析 Semaphore 会简单很多。Semaphore 是什么呢?它类似一个资源池(读者可以类比线程池),每个线程需要调用 acquire() 方法获取资源,然后才能执行,执行完后,需要 release 资源,让给其他的线程用。
Semaphore 是 AQS 中共享锁的使用
套路解读:创建 Semaphore 实例的时候,需要一个参数 permits,这个基本上可以确定是设置给 AQS 的 state 的,然后每个线程调用 acquire 的时候,执行 state = state - 1,release 的时候执行 state = state + 1,当然,acquire 的时候,如果 state = 0,说明没有资源了,需要等待其他线程 release。
构造方法:
1
2
3
4
5
6
7
public Semaphore (int permits ) { sync = new NonfairSync (permits ); } public Semaphore (int permits , boolean fair) { sync = fair ? new FairSync (permits ) : new NonfairSync (permits ); }
这里和 ReentrantLock 类似,用了公平策略和非公平策略。
看 acquire 方法:
1
2
3
4
5
6
7
8
9
10
11
12
13
14
public void acquire () throws InterruptedException { sync.acquireSharedInterruptibly(1 ); } public void acquireUninterruptibly () { sync.acquireShared(1 ); } public void acquire (int permits ) throws InterruptedException { if (permits < 0 ) throw new IllegalArgumentException (); sync.acquireSharedInterruptibly(permits ); } public void acquireUninterruptibly (int permits ) { if (permits < 0 ) throw new IllegalArgumentException (); sync.acquireShared(permits ); }
这几个方法也是老套路了,大家基本都懂了吧,这边多了两个可以传参的 acquire 方法,不过大家也都懂的吧,如果我们需要一次获取超过一个的资源,会用得着这个的。
我们接下来看不抛出 InterruptedException 异常的 acquireUninterruptibly() 方法吧:
1
2
3
4
5
6
7
public void acquireUninterruptibly () { sync.acquireShared(1 ); } public final void acquireShared (int arg) { if (tryAcquireShared(arg) < 0 ) doAcquireShared(arg); }
前面说了,Semaphore 分公平策略和非公平策略,我们对比一下两个 tryAcquireShared 方法:
1 2 3 4 5 6 7 8 9 10 11 12 13 14 15 16 17 18 19 20 21 22 23 24 25 26 protected int tryAcquireShared (int acquires) { for (;;) { if (hasQueuedPredecessors()) return -1 ; int available = getState(); int remaining = available - acquires; if (remaining < 0 || compareAndSetState(available, remaining)) return remaining; } } protected int tryAcquireShared (int acquires) { return nonfairTryAcquireShared(acquires); } final int nonfairTryAcquireShared (int acquires) { for (;;) { int available = getState(); int remaining = available - acquires; if (remaining < 0 || compareAndSetState(available, remaining)) return remaining; } }
也是老套路了,所以从源码分析角度的话,我们其实不太需要关心是不是公平策略还是非公平策略,它们的区别往往就那么一两行。
我们再回到 acquireShared 方法,
1
2
3
4
public final void acquireShared (int arg) { if (tryAcquireShared(arg) < 0 ) doAcquireShared(arg); }
由于 tryAcquireShared(arg) 返回小于 0 的时候,说明 state 已经小于 0 了(没资源了),此时 acquire 不能立马拿到资源,需要进入到阻塞队列等待,虽然贴了很多代码,不在乎多这点了:
1
2
3
4
5
6
7
8
9
10
11
12
13
14
15
16
17
18
19
20
21
22
23
24
25
26
27
private void doAcquireShared (int arg) { final Node node = addWaiter(Node.SHARED); boolean failed = true ; try { boolean interrupted = false ; for (;;) { final Node p = node.predecessor(); if (p == head) { int r = tryAcquireShared(arg); if (r >= 0 ) { setHeadAndPropagate(node, r); p.next = null ; if (interrupted) selfInterrupt(); failed = false ; return ; } } if (shouldParkAfterFailedAcquire(p, node) && parkAndCheckInterrupt()) interrupted = true ; } } finally { if (failed) cancelAcquire(node); } }
这个方法我就不介绍了,线程挂起后等待有资源被 release 出来。接下来,我们就要看 release 的方法了:
1 2 3 4 5 6 7 8 9 10 11 12 13 14 15 16 17 18 19 20 21 22 23 public void release () { sync.releaseShared(1 ); } public final boolean releaseShared (int arg) { if (tryReleaseShared(arg)) { doReleaseShared(); return true ; } return false ; } protected final boolean tryReleaseShared (int releases) { for (;;) { int current = getState(); int next = current + releases; if (next < current) throw new Error ("Maximum permit count exceeded" ); if (compareAndSetState(current, next)) return true ; } }
tryReleaseShared 方法总是会返回 true,然后是 doReleaseShared,这个也是我们熟悉的方法了,我就贴下代码,不分析了,这个方法用于唤醒所有的等待线程:
1
2
3
4
5
6
7
8
9
10
11
12
13
14
15
16
17
18
private void doReleaseShared () { for (;;) { Node h = head; if (h != null && h != tail) { int ws = h.waitStatus; if (ws == Node.SIGNAL) { if (!compareAndSetWaitStatus(h, Node.SIGNAL, 0 )) continue ; unparkSuccessor(h); } else if (ws == 0 && !compareAndSetWaitStatus(h, 0 , Node.PROPAGATE)) continue ; } if (h == head) break ; } }