资料来源:地址
1. 前置知识
1.1 spring中bean注入的三种形式
1 | @Data |
setter注入
1
2
3
4
5
6
7
8
9
10
11
12
13
14
15// 1. 创建applicationContext.xml文件
<!-- 手动配置bean对象 -->
<bean id="person" class="pojo.Person">
<property name="name" value="dzzhyk"/>
<property name="age" value="20"/>
<property name="sex" value="true"/>
</bean>
// 2. 创建测试类
@Test
public void test(){
ApplicationContext ca = new ClassPathXmlApplicationContext("applicationContext.xml");
Person person = ca.getBean("person", Person.class);
System.out.println(person);
}输出:
1
Person(name=dzzhyk, age=20, sex=true)
构造器注入
1
2
3
4
5
6
7
8
9
10
11
12
13
14
15
// 1. 创建applicationContext.xml文件
<!-- 使用构造器 -->
<bean id="person" class="pojo.Person">
<constructor-arg index="0" type="java.lang.String" value="dzzhyk" />
<constructor-arg index="1" type="java.lang.Integer" value="20"/>
<constructor-arg index="2" type="java.lang.Boolean" value="true"/>
</bean>
// 2. 创建测试类
@Test
public void test(){
ApplicationContext ca = new ClassPathXmlApplicationContext("applicationContext.xml");
Person person = ca.getBean("person", Person.class);
System.out.println(person);
}输入:
1
Person(name=dzzhyk, age=20, sex=true)
属性注入
1
2
3
4
5
6
7
8
9
10
11
12
13
14
15
16
17
18
19
20
21
22
23// 1. 在applicationContext.xml中开启注解支持和自动包扫描
<context:annotation-config />
<context:component-scan base-package="pojo"/>
// 2. 在pojo类中对Person类加上@Component注解,将其标记为组件,并且使用@Value注解为各属性赋初值
@Component
public class Person {
@Value("dzzhyk")
private String name;
@Value("20")
private Integer age;
@Value("true")
private Boolean sex;
}
// 3. 创建测试类
@Test
public void test(){
ApplicationContext ac = new ClassPathXmlApplicationContext("applicationContext.xml");
Person person = ac.getBean("person", Person.class);
System.out.println(person);
}输出:
1
Person(name=dzzhyk, age=20, sex=true)
1.2 Spring的两种配置方式
1 | public class Car { |
基于xml的配置
1
2
3
4
5
6
7
8
9
10
11
12
13
14
15
16
17
18
19
20
21
22
23
24
25
26// 1. 创建配置文件
<bean id="person" class="pojo.Person">
<property name="name" value="dzzhyk"/>
<property name="age" value="20"/>
<property name="sex" value="true"/>
<property name="dog" ref="dog"/>
<property name="car" ref="car"/>
</bean>
<bean id="dog" class="pojo.Dog">
<property name="name" value="旺财"/>
<property name="age" value="5" />
</bean>
<bean id="car" class="pojo.Car">
<property name="brand" value="奥迪双钻"/>
<property name="price" value="100000"/>
</bean>
// 2. 创建测试类
@Test
public void test(){
ClassPathXmlApplicationContext ca = new ClassPathXmlApplicationContext("applicationContext.xml");
Person person = ca.getBean("person", Person.class);
System.out.println(person);
}输出:
1
Person(name=dzzhyk, age=20, sex=true, dog=Dog(name=旺财, age=5), car=Car(brand=奥迪双钻, price=100000))
基于JavaConfig类的配置
需要使用
@Configuration注解。1
2
3
4
5
6
7
8
9
10
11
12
13
14
15
16
17
18
19
20
21
22
23
24
25
26
27// 1. 创建配置类
@Configuration
@ComponentScan
public class PersonConfig {
@Bean
public Person person(Dog dog, Car car){
return new Person("dzzhyk", 20, true, dog, car);
}
@Bean
public Dog dog(){
return new Dog("旺财", 5);
}
@Bean
public Car car(){
return new Car("奥迪双钻", 100000);
}
}
// 2. 创建测试类
@Test
public void test(){
AnnotationConfigApplicationContext ac = new AnnotationConfigApplicationContext(PersonConfig.class);
Person person = ac.getBean("person", Person.class);
System.out.println(person);
}输出:
1
Person(name=dzzhyk, age=20, sex=true, dog=Dog(name=旺财, age=5), car=Car(brand=奥迪双钻, price=100000))
1.3 BeanDefinition的三个重要属性
1 | // 控制bean定义的类 |
2. 自动装配的思考
上面的自动装配,我们至少要写一个配置文件,无论是什么形式,我们都至少需要一个文件把它全部写下来,就算这个文件的内容是固定的,但是为了装配这个对象,我们不得不写。
1 | BeanMapper.xml |
有了这些模板,我们只需要点点点,再进行修改,就能用了。
一个配置文件都不想写,程序还能照样跑,我只关心有我需要的组件就可以了,我只需要关注我的目标就可以了。
有的,就是SpringBoot。
3. 一个例子
3.1 创建配置类
1 | @Component("a") |
3.2 创建测试类
1 | @Test |
3.3 输出
1 | A(name=我是AAA, b=B(name=我是BBB)) |
3.4 @Import注解-使用
@Import的功能就是获取某个类的bean对象
1 | // 1. 需要哪个Bean定义,直接Import他的class即可 |
3.5 总结
上面自动装配流程如下:
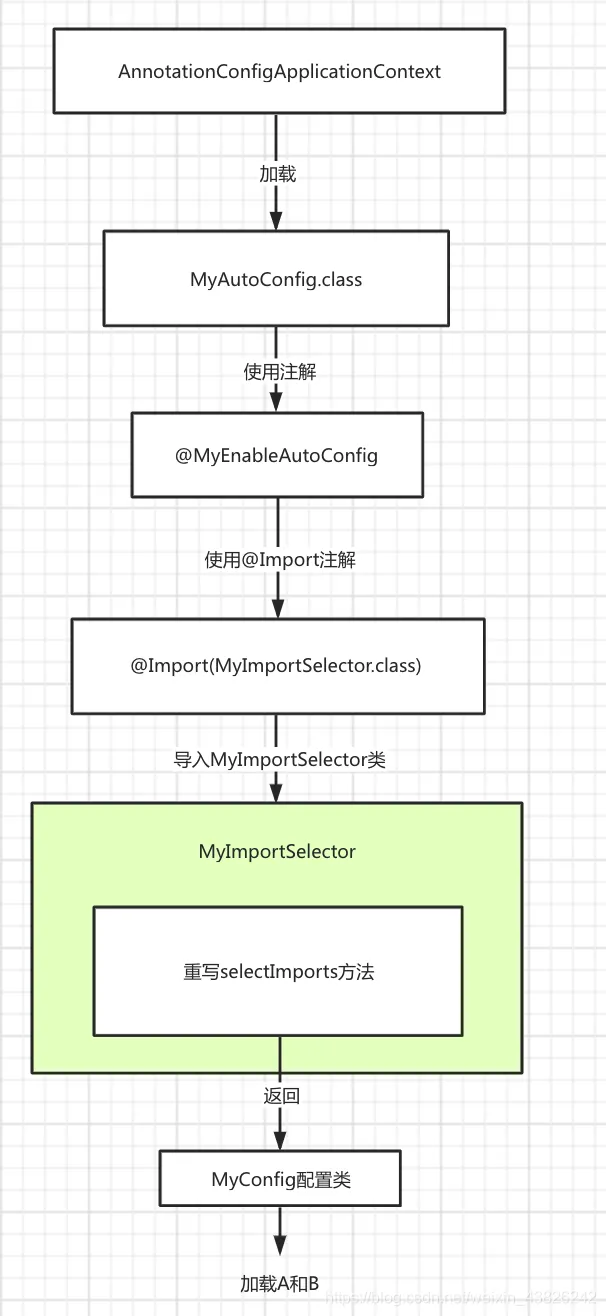
更进一步:创建一个配置文件properties来专门保存我这个需求所使用的bean对象,然后使用的时候在MyImportSelector中读取配置文件并且返回全包名。
1 | public class MyImportSelector implements ImportSelector { |
如此以来:无论是添加或者删除组件,无非是在配置文件中加上或者删除一行的问题了。
4. 源码解析
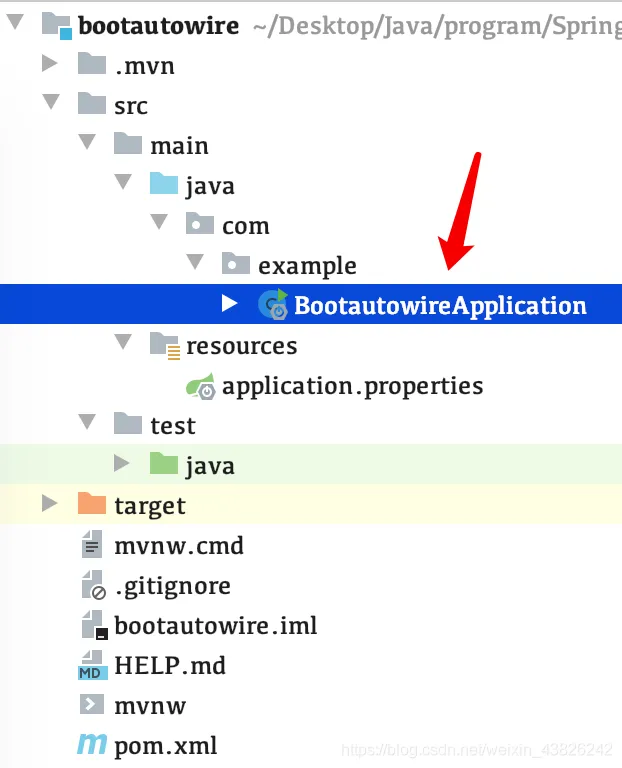
一个SpringBoot”空项目“,没有添加任何依赖包和starter包。
启动项目:
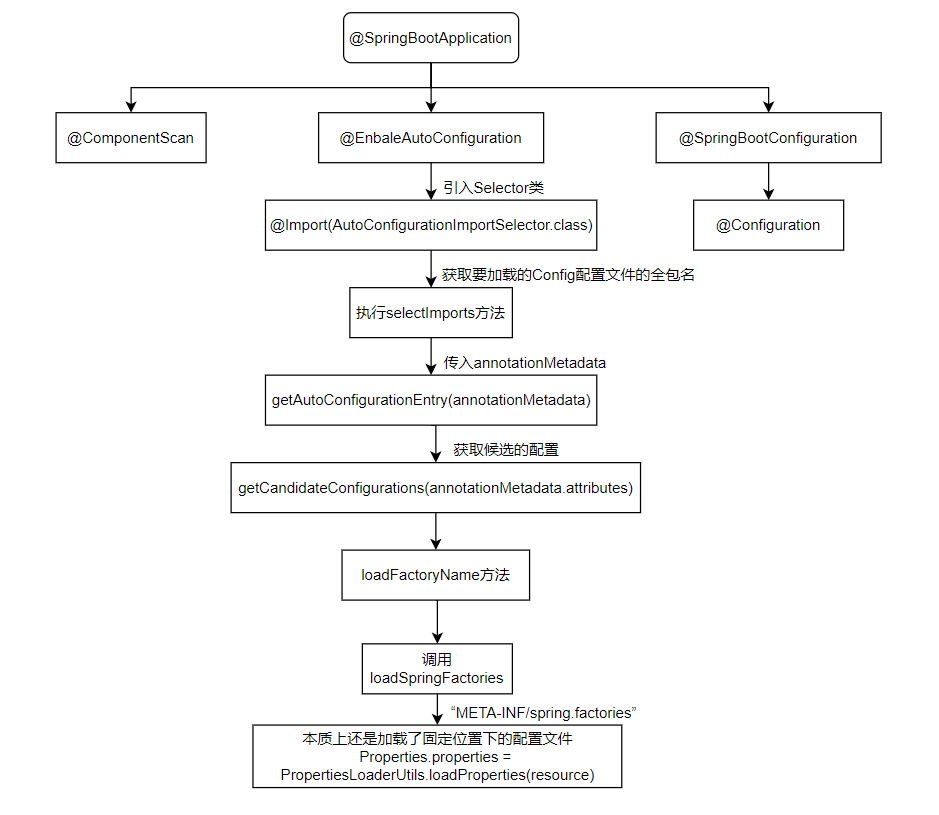
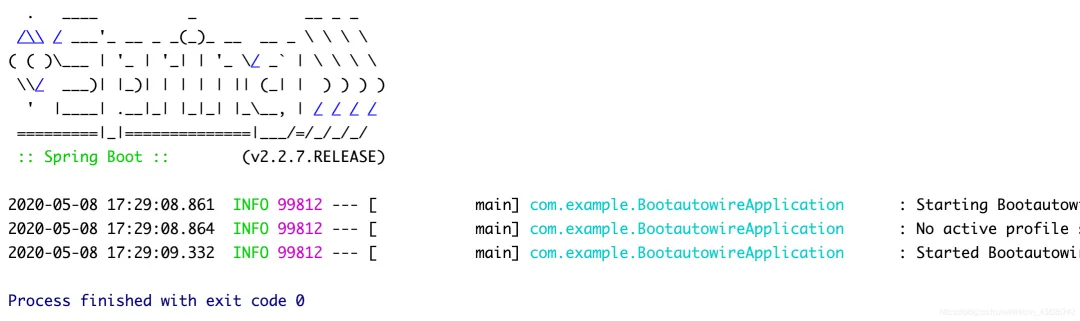 正常启动,让我们从@SpringBootApplication开始研究。
1 | @SpringBootConfiguration |
4.1 @SpringBootConfiguration
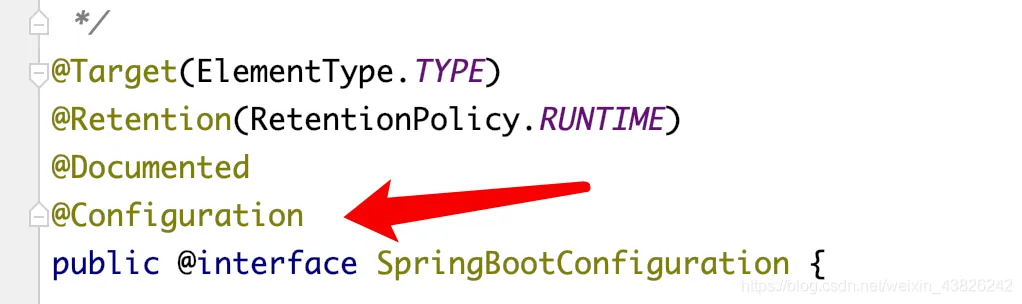
就是一个@Configuration,JavaConfig的配置类
4.2 @ComponentScan
组件扫描
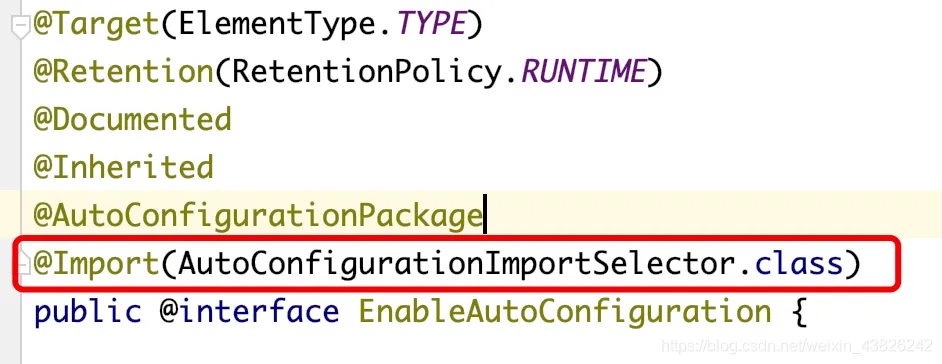
4.3 @EnableAutoConfiguration
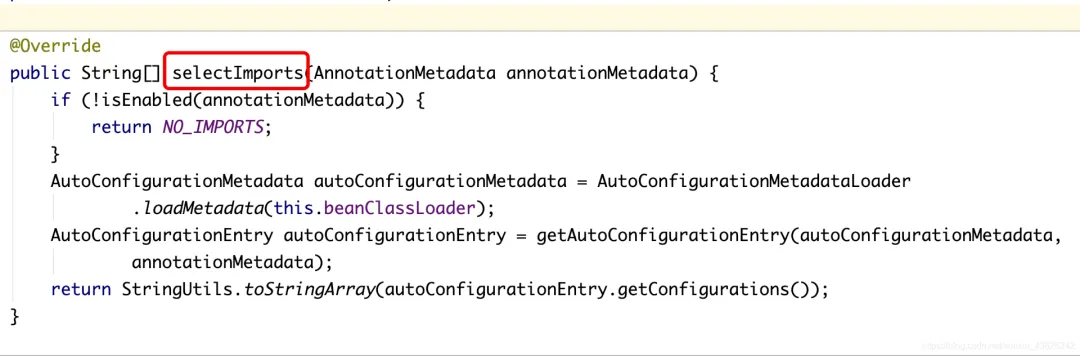
AutoConfigurationImportSelector重写了selectImports方法:
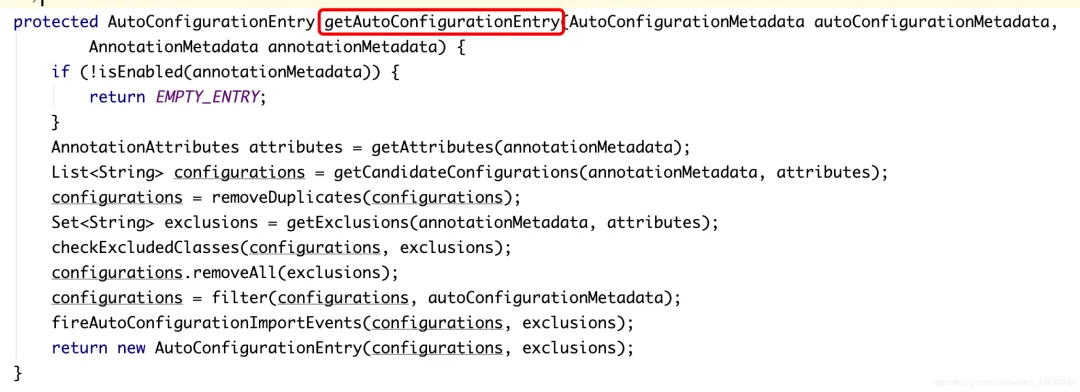 注意到最后一行构造函数:
1 | configurations, exclusions |
定位到getCandidateConfigurations(annotationMetadata,attributes),如下:
 通过读取指定路径下的配置文件获取配置,这个配置文件就叫spring.factories,存放的路径是META-INF/spring.factories。
打开spring boot自动装配的依赖jar包:

这个配置文件里面的内容如下:
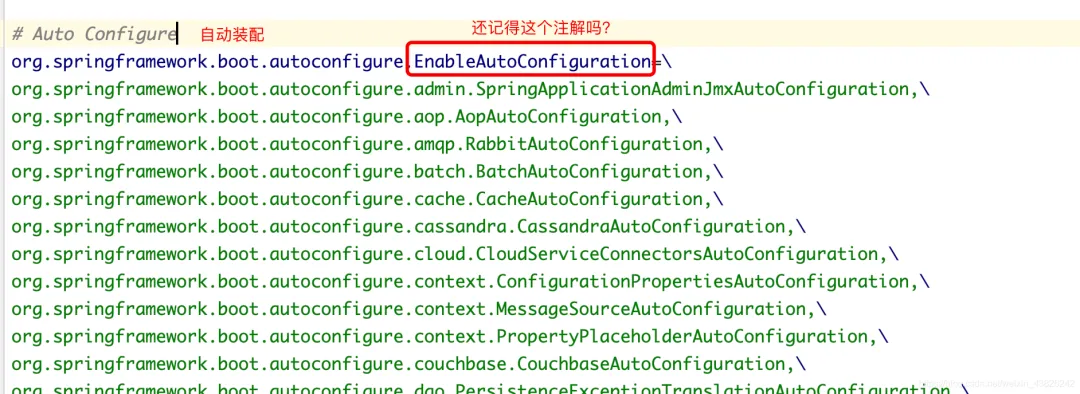
自动装配到底是什么,应该比较清楚了,原来他是帮我们加载了各种已经写好的Config类文件,实现了这些JavaConfig配置文件的重复利用和组件化
4.4 loadFactoryNames方法
进入loadFactoryNames方法:

其中loadSpringFactories方法:

返回了一个容器:Map<String, List> 这个容器的类型是:MultiValueMap<String, String>;简单来说,一个key可以对应多个value。
不难想到MultiValueMap中存放的形式:是”注解的类名——多个Config配置类“ 让我们打个断点来验证一下:
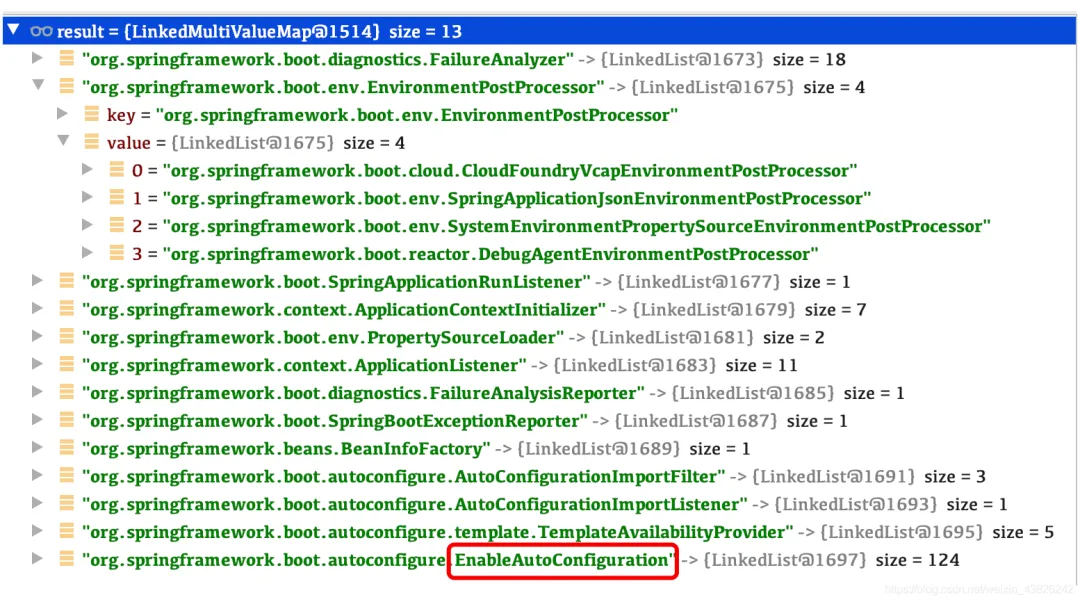 果然是这样,并且@EnableAutoConfiguration注解竟然加载了多达124个配置类!
读取配置文件的操作:通过找到路径,然后根据路径读取了配置文件,然后返回了读取的result。
- 入口

- 静态常量FACTORIES_RESOURCE_LOCATION

- loadProperties方法

4.5 cache探秘

如果从缓存中读取出来了result,并且result的结果不为空,就直接返回,不需要再进行下面的读写操作了,这样减少了磁盘频繁的读写I/O。
4.6 getAutoConfigurationEntry再探
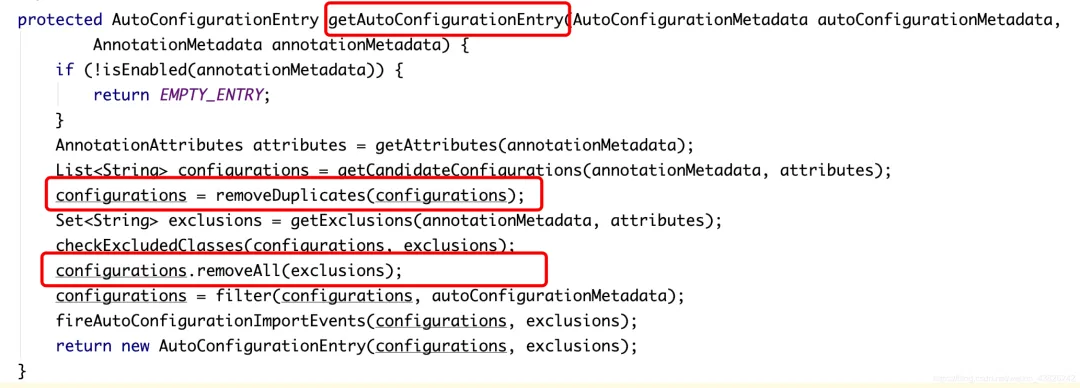
这个类除了getCandidateConfigurations还干了哪些事情:
- removeDuplicates
- configurations.removeAll(exclusions)
可以看到,这里对加载进来的配置进行了去重、排除的操作,这是为了使得用户自定义的排除包生效,同时避免包冲突异常,在SpringBoot的入口函数中我们可以通过注解指定需要排除哪些不用的包:
例如我不使用RabbitMQ的配置包,就把它的配置类的class传给exclude
1 | @SpringBootApplication(exclude = {RabbitAutoConfiguration.class}) |
5. 总结
- 自动装配的对象:Bean的定义(BeanDefinition)
- SpringBoot自动装配的本质就是通过Spring去读取META-INF/spring.factories中保存的配置类文件然后加载bean定义的过程。
- 如果是标了@Configuration注解,就是批量加载了里面的bean定义
- 如何实现”自动“:通过配置文件获取对应的批量配置类,然后通过配置类批量加载bean定义,只要有写好的配置文件spring.factories就实现了自动。