1. AQS简介
抽象同步队列,实现同步器的基础组件,如常用的ReentrantLock、Semaphore、CountDownLatch等。
AQS定义了一套多线程访问共享资源的同步模板,解决了实现同步器时涉及的大量细节问题,能够极大地减少实现工作。
2. 结构 1 2 3 4 5 6 7 8 9 10 11 12 13 private transient volatile Node head;private transient volatile Node tail;private volatile int state;private transient Thread exclusiveOwnerThread;
状态
getState():返回同步状态setState(int newState):设置同步状态compareAndSetState(int expect, int update):使用CAS设置同步状态isHeldExclusively():当前线程是否持有资源
acquire
void acquire(int arg)
void acquireInterruptibly(int arg)
void acquireShared(int arg)
void acquireSharedInterruptibly(int arg)
boolean tryAcquire(int arg)〔aqs没有实现〕
boolean tryAcquireNanos(int arg, long nanosTimeout)
int tryAcquireShared(int arg)〔aqs没有实现〕
boolean tryAcquireSharedNanos(int arg, long nanosTimeout)
release
boolean release(int arg)
boolean releaseShared(int arg)
boolean tryRelease(int arg)〔aqs没有实现〕
boolean tryReleaseShared(int arg)〔aqs没有实现〕
1 2 3 4 5 6 7 8 9 10 11 12 13 14 15 16 17 18 19 20 21 22 23 24 25 26 static final class Node { static final Node SHARED = new Node (); static final Node EXCLUSIVE = null ; static final int CANCELLED = 1 ; static final int SIGNAL = -1 ; static final int CONDITION = -2 ; static final int PROPAGATE = -3 ; volatile int waitStatus; volatile Node prev; volatile Node next; volatile Thread thread; }
1 2 3 4 5 6 7 8 9 10 public class ConditionObject implements Condition , java.io.Serializable { private static final long serialVersionUID = 1173984872572414699L ; private transient Node firstWaiter; private transient Node lastWaiter; ...... }
await():实现了condition接口中的await方法
awaitNanos(long nanosTimeout):实现定时条件等待
awaitUntil(Date deadline):实现定时的等待
await(long time, TimeUnit unit):
signal():发出信号,将一个队列中的等待的线程唤醒
doSignal(Node first):将链表中的第一个Node变成null。之后将链表后面Node前移
signalAll():发出信号,将队列中的全部等待Node都唤醒
doSignalAll(Node first):将队列中的全部Node都清空,并挨个调用transferForSignal方法
3. AQS源码 3.1 线程抢锁 从ReentrantLock的默认实现FairSync类的lock方法开始讲起。
1 2 3 4 5 6 public final void acquire(int arg) { if (!tryAcquire(arg) && acquireQueued(addWaiter(Node.EXCLUSIVE), arg)) { selfInterrupt(); } }
1 2 3 4 5 6 7 8 9 10 11 12 13 14 15 16 17 18 19 20 21 22 23 24 25 26 27 28 29 30 31 // 尝试直接获取锁 // 返回true代表是否获取到锁: // 1.没有线程在等待锁; // 2.重入锁,线程本来就持有锁,也就可以理所当然可以直接获取 protected final boolean tryAcquire(int acquires) { final Thread current = Thread.currentThread(); int c = getState(); // 1. state == 0表示:此时此刻没有线程持有锁 if (c == 0) { // 判断线程是否需要排队,不需要排队则返回false if (!hasQueuedPredecessors() && // 如果没有线程在等待,那就用CAS尝试一下, // 成功了就获取到锁了, // 不成功的话,只能说明一个问题,就在刚刚几乎同一时刻有个线程抢先了 compareAndSetState(0, acquires)) { setExclusiveOwnerThread(current); return true; } } // 2. 重入锁,这里不存在并发问题 else if (current == getExclusiveOwnerThread()) { int nextc = c + acquires; if (nextc < 0) throw new Error("Maximum lock count exceeded"); setState(nextc); return true; } return false; }
1 2 3 4 5 6 7 8 9 10 11 12 13 14 15 16 17 18 19 20 21 // 入参:Node.EXCLUSIVE,代表独占模式 // 作用:把线程包装成node,同时进入到队列中 private Node addWaiter(Node mode) { Node node = new Node(Thread.currentThread(), mode); // 把当前node加到链表的最后面去 Node pred = ta // 队列不为空 if (pred != null) { // 将当前的队尾节点,设置为自己的前驱 node.prev = pred; // 用CAS把自己设置为队尾 if (compareAndSetTail(pred, node)) { // 设置双向链表 pred.next = node; return node; } } // 说明 pred==null(队列是空的) 、 CAS失败(有线程在竞争入队) enq(node); return node; }
1 2 3 4 5 6 7 8 9 10 11 12 13 14 15 16 17 18 19 private Node enq(final Node node) { for (;;) { Node t = tail; // 1. 队列是空的 if (t == null) { // Must initialize // 初始化head节点 if (compareAndSetHead(new Node())) // 把tail指向head,注意:这里只是设置了tail=head,这里没有return tail = head; } else { // 将当前线程排到队尾,有线程竞争的话排不上重复排 node.prev = t; if (compareAndSetTail(t, node)) { t.next = node; return t; } } } }
1 2 3 4 5 6 7 8 9 10 11 12 13 14 15 16 17 18 19 20 21 22 23 24 25 26 27 28 29 30 31 32 33 34 35 36 37 38 39 40 41 42 // 前提:已将node放入阻塞队列队尾 // 入参:当前线程包装成的node,1 // 出参:需要 返回false, // 作用:将线程挂起,然后被唤醒后去获取锁 final boolean acquireQueued(final Node node, int arg) { boolean failed = true; try { boolean interrupted = false; for (;;) { final Node p = node.predecessor(); // p == head 说明当前节点的前驱是head // 当前节点可以去试抢一下锁,为什么呢? // 首先,它是队头,这个是第一个条件,其次,当前的head有可能是刚刚初始化的node, // enq(node) 方法里面有提到,head是延时初始化的,而且new Node()的时候没有设置任何线程 // 即:当前的head不属于任何一个线程,所以node作为队头,可以去尝试操作state // tryAcquire简单用CAS试操作一下state if (p == head && tryAcquire(arg)) { setHead(node); p.next = null; // help GC failed = false; return interrupted; } // 走到这里,说明: // 要么当前node本来就不是队头, // 要么就是tryAcquire(arg)没有抢赢别人 if (shouldParkAfterFailedAcquire(p, node) && parkAndCheckInterrupt()) /** * private final boolean parkAndCheckInterrupt() { * LockSupport.park(this); * return Thread.interrupted(); * } **/ interrupted = true; } } finally { // 什么时候 failed 会为 true ? // tryAcquire() 方法抛异常的情况 if (failed) cancelAcquire(node); } }
1 2 3 4 5 6 7 8 9 10 11 12 13 14 15 16 17 18 19 20 21 22 23 24 25 26 27 28 29 30 31 32 // 作用:当前线程没有抢到锁,是否需要挂起当前线程? // 入参: // 第一个参数是前驱节点, // 第二个参数才是代表当前线程的节点 // 出参: // 返回true, 说明前驱节点的waitStatus==-1,那么当前线程需要被挂起,等待以后被唤醒 // 返回false, 说明当前不需要被挂起 private static boolean shouldParkAfterFailedAcquire(Node pred, Node node) { int ws = pred.waitStatus; // 前驱节点的 waitStatus == -1 ,说明前驱节点状态正常 if (ws == Node.SIGNAL) // 当前线程需要挂起,直接可以返回true return true; // 前驱节点 waitStatus大于0 : 说明前驱节点取消了排队。 // 进入阻塞队列排队的线程会被挂起,而唤醒的操作是由前驱节点完成的。 // 将当前节点的prev指向waitStatus<=0的节点,往前遍历找前驱节点 if (ws > 0) { do { node.prev = pred = pred.prev; } while (pred.waitStatus > 0); pred.next = node; } else { // 首次进入,前驱节点是之前的 tail,那么它的 waitStatus 应该是 0 // 用CAS将前驱节点的waitStatus设置为Node.SIGNAL(也就是-1) compareAndSetWaitStatus(pred, ws, Node.SIGNAL); } // 这个方法返回 false,那么会再走一次 for 循序, // 然后再次进来此方法,此时会从第一个分支返回 true return false; }
3.2 解锁 正常情况下,如果线程没获取到锁,线程会被 LockSupport.park(this); 挂起停止,等待被唤醒。
1 2 3 public void unlock () { sync.release(1 ); }
1 2 3 4 5 6 7 8 9 public final boolean release(int arg) { if (tryRelease(arg)) { Node h = head; if (h != null && h.waitStatus != 0) unparkSuccessor(h); return true; } return false; }
1 2 3 4 5 6 7 8 9 10 11 12 13 14 protected final boolean tryRelease(int releases) { int c = getState() - releases; if (Thread.currentThread() != getExclusiveOwnerThread()) throw new IllegalMonitorStateException(); // 是否完全释放锁 boolean free = false; // 如果c==0,也就是说没有嵌套锁了,可以释放了,否则还不能释放掉 if (c == 0) { free = true; setExclusiveOwnerThread(null); } setState(c); return free; }
1 2 3 4 5 6 7 8 9 10 11 12 13 14 15 16 17 18 19 20 21 22 23 // 作用:唤醒后继节点 // 入参:参数node是head头结点 private void unparkSuccessor(Node node) { int ws = node.waitStatus; // 如果head节点当前waitStatus<0, 将其修改为0 if (ws < 0) compareAndSetWaitStatus(node, ws, 0); // 下面开始 唤醒后继节点,但是有可能后继节点取消了等待(waitStatus==1) // 从队尾往前找,找到waitStatus<=0的所有节点中排在最前面的 Node s = node.next; if (s == null || s.waitStatus > 0) { s = null; // 从后往前找,仔细看代码,不必担心中间有节点取消(waitStatus==1)的情况 for (Node t = tail; t != null && t != node; t = t.prev) if (t.waitStatus <= 0) s = t; } if (s != null) // 唤醒线程 LockSupport.unpark(s.thread); }
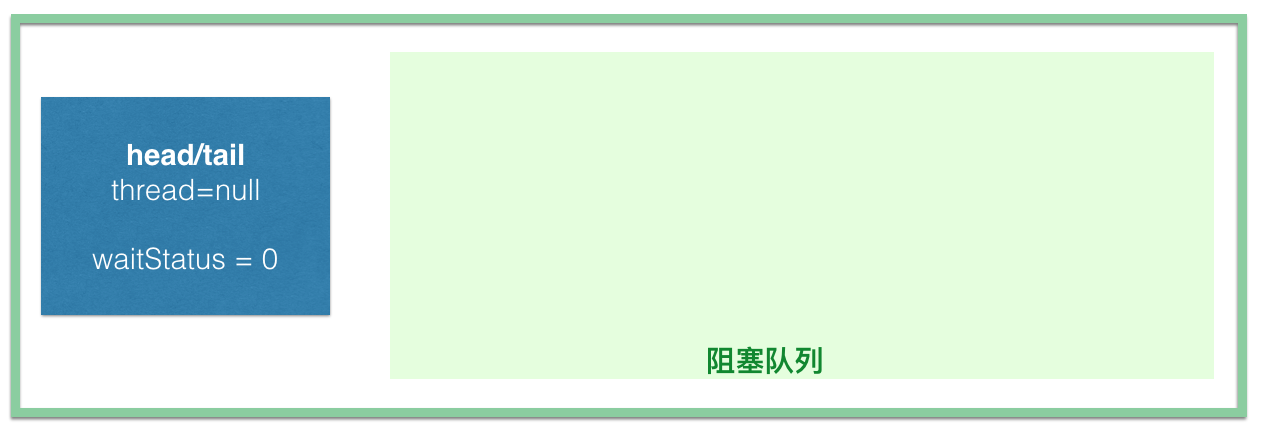
3.3 多线程调用lock()方法CLH队列的变化 首先,第一个线程调用 reentrantLock.lock(),tryAcquire(1) 直接就返回 true 。只是设置了 state=1,连 head 都没有初始化,更谈不上什么阻塞队列了。
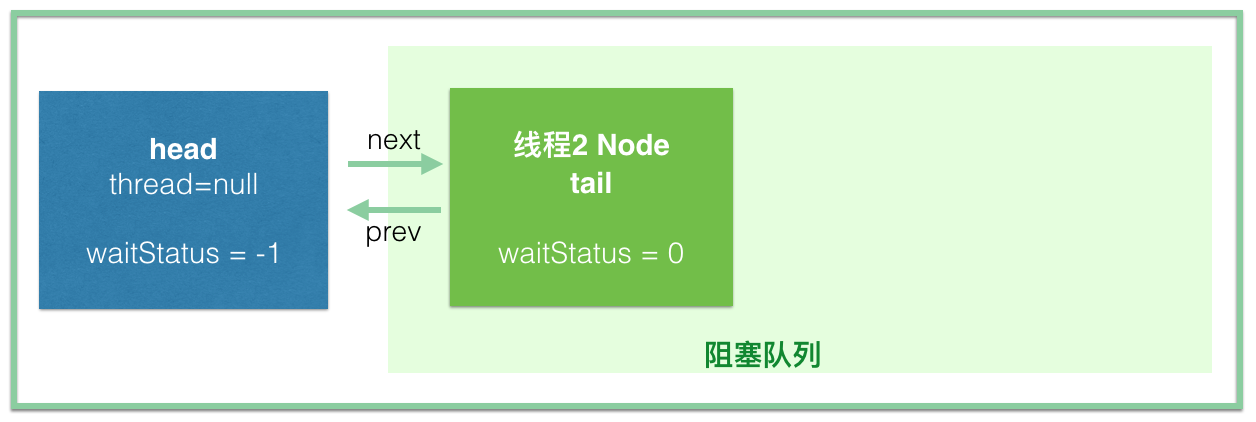
其次,如果线程 1 没有调用 unlock() 之前,线程 2 调用了 lock(),
线程 2 会初始化 head【new Node()】,同时线程 2 也会插入到阻塞队列并挂起 (注意看这里是一个 for 循环,而且设置 head 和 tail 的部分是不 return 的,只有入队成功才会跳出循环)
1 2 3 4 5 6 7 8 9 10 11 12 13 14 15 private Node enq (final Node node) { for (;;) { Node t = tail; if (t == null ) { if (compareAndSetHead(new Node ())) tail = head; } else { node.prev = t; if (compareAndSetTail(t, node)) { t.next = node; return t; } } } }
a. 线程 2 初始化 head 节点,此时 head==tail, waitStatus==0
注意:shouldParkAfterFailedAcquire 这个方法的时候,线程 2 会把前驱节点,也就是 head 的waitStatus设置为 -1。
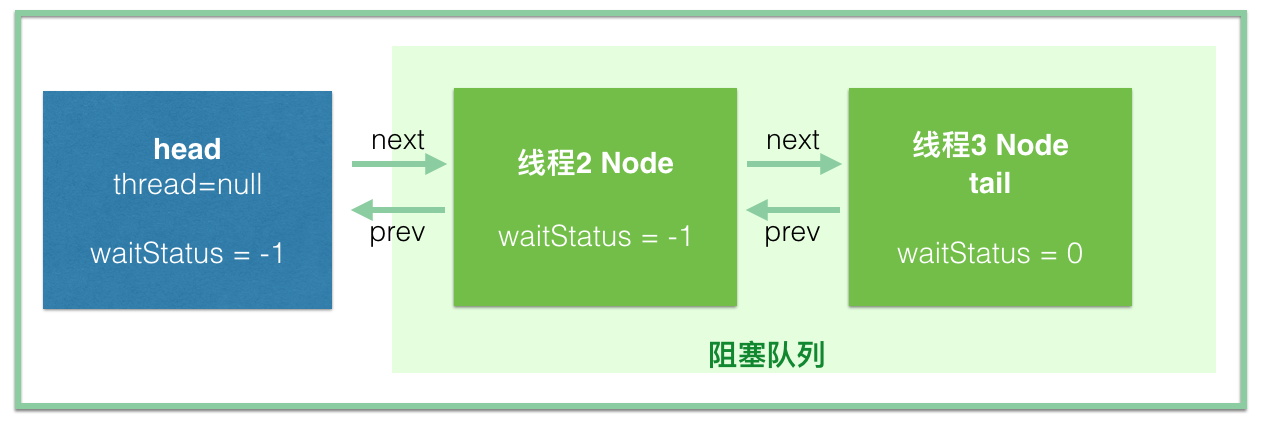
c. 线程 3 此时再进来,直接插到线程 2 的后面就可以了,此时线程 3 的 waitStatus 是 0,到 shouldParkAfterFailedAcquire 方法的时候把前驱节点线程 2 的 waitStatus 设置为 -1。
4. ConditionObject源码 生产者和消费者的例子
1 2 3 4 5 6 7 8 9 10 11 12 13 14 15 16 17 18 19 20 21 22 23 24 25 26 27 28 29 30 31 32 33 34 35 36 37 38 39 40 class BoundedBuffer { final Lock lock = new ReentrantLock (); final Condition notFull = lock.newCondition(); final Condition notEmpty = lock.newCondition(); final Object[] items = new Object [100 ]; int putptr, takeptr, count; public void put (Object x) throws InterruptedException { lock.lock(); try { while (count == items.length) notFull.await(); items[putptr] = x; if (++putptr == items.length) putptr = 0 ; ++count; notEmpty.signal(); } finally { lock.unlock(); } } public Object take () throws InterruptedException { lock.lock(); try { while (count == 0 ) notEmpty.await(); Object x = items[takeptr]; if (++takeptr == items.length) takeptr = 0 ; --count; notFull.signal(); return x; } finally { lock.unlock(); } } }
condition 是依赖于 ReentrantLock 的,不管是调用 await 进入等待还是 signal 唤醒,都必须获取到锁才能进行操作 。
每个 ReentrantLock 实例可以通过调用多次 newCondition 产生多个 ConditionObject 的实例:
1 2 3 4 final ConditionObject newCondition () { return new ConditionObject (); }
条件队列和阻塞队列的节点,都是 Node 的实例,条件队列的节点是需要转移到阻塞队列中去的;
一个 ReentrantLock 实例可以通过多次调用 newCondition() 来产生多个 Condition 实例,这里对应 condition1 和 condition2。注意,ConditionObject 只有两个属性 firstWaiter 和 lastWaiter;
每个 condition 有一个关联的条件队列 ,如线程 1 调用 condition1.await() 方法即可将当前线程 1 包装成 Node 后加入到条件队列中,然后阻塞在这里,不继续往下执行,条件队列是一个单向链表;
调用condition1.signal() 触发一次唤醒,此时唤醒的是队头,会将condition1 对应的条件队列 的 firstWaiter(队头) 移到阻塞队列的队尾 ,等待获取锁,获取锁后 await 方法才能返回,继续往下执行
4.1 await()方法 1 2 3 4 5 6 7 8 9 10 11 12 13 14 15 16 17 18 19 20 21 22 23 24 25 26 27 28 29 public final void await() throws InterruptedException { // 既然该方法要响应中断,那么在最开始就判断中断状态 if (Thread.interrupted()) throw new InterruptedException(); // 1. 添加到 condition 的条件队列中 Node node = addConditionWaiter(); // 2. 释放锁,返回值是释放锁之前的 state 值 // await() 之前,当前线程是必须持有锁的,这里肯定要释放掉 int savedState = fullyRelease(node); int interruptMode = 0; // 这里退出循环有两种情况,之后再仔细分析 // 1. isOnSyncQueue(node) 返回 true,即当前 node 已经转移到阻塞队列了 // 2. checkInterruptWhileWaiting(node) != 0 会到 break,然后退出循环,代表的是线程中断 while (!isOnSyncQueue(node)) { LockSupport.park(this); if ((interruptMode = checkInterruptWhileWaiting(node)) != 0) break; } // 被唤醒后,将进入阻塞队列,等待获取锁 if (acquireQueued(node, savedState) && interruptMode != THROW_IE) interruptMode = REINTERRUPT; if (node.nextWaiter != null) // clean up if cancelled unlinkCancelledWaiters(); if (interruptMode != 0) reportInterruptAfterWait(interruptMode); }
4.1.1 将节点加入到条件队列-addConditionWaiter()-unlinkCancelledWaiters() addConditionWaiter() 是将当前节点加入到条件队列
1 2 3 4 5 6 7 8 9 10 11 12 13 14 15 16 17 18 19 20 21 22 // 将当前线程对应的节点入队,插入队尾 private Node addConditionWaiter() { Node t = lastWaiter; // 如果条件队列的最后一个节点取消了,将其清除出去 // 为什么这里把 waitStatus 不等于 Node.CONDITION,就判定为该节点发生了取消排队? if (t != null && t.waitStatus != Node.CONDITION) { // 这个方法会遍历整个条件队列,然后会将已取消的所有节点清除出队列 unlinkCancelledWaiters(); t = lastWaiter; } // node 在初始化的时候,指定 waitStatus 为 Node.CONDITION Node node = new Node(Thread.currentThread(), Node.CONDITION); // t 此时是 lastWaiter,队尾 // 如果队列为空 if (t == null) firstWaiter = node; else t.nextWaiter = node; lastWaiter = node; return node; }
在addWaiter 方法中,有一个 unlinkCancelledWaiters() 方法,该方法被调用的场景:当 await 的时候如果发生了取消操作(这点之后会说)或者是在节点入队的时候,发现最后一个节点是被取消的。该方法用于清除队列中已经取消等待的节点。
1 2 3 4 5 6 7 8 9 10 11 12 13 14 15 16 17 18 19 20 21 // 等待队列是一个单向链表,遍历链表将已经取消等待的节点清除出去 private void unlinkCancelledWaiters() { Node t = firstWaiter; Node trail = null; while (t != null) { Node next = t.nextWaiter; // 如果节点的状态不是 Node.CONDITION 的话,这个节点就是被取消的 if (t.waitStatus != Node.CONDITION) { t.nextWaiter = null; if (trail == null) firstWaiter = next; else trail.nextWaiter = next; if (next == null) lastWaiter = trail; } else trail = t; t = next; } }
4.1.2 完全释放独占锁-fullyRelease(Node node) 回到 wait 方法,节点入队了以后,会调用 int savedState = fullyRelease(node); 方法释放锁,注意,这里是完全释放独占锁(fully release),因为 ReentrantLock 是可以重入的。
考虑一下这里的 savedState。如果在 condition1.await() 之前,假设线程先执行了 2 次 lock() 操作,那么 state 为 2,我们理解为该线程持有 2 把锁,这里 await() 方法必须将 state 设置为 0,然后再进入挂起状态,这样其他线程才能持有锁。当它被唤醒的时候,它需要重新持有 2 把锁,才能继续下去。
1 2 3 4 5 6 7 8 9 10 11 12 13 14 15 16 17 18 19 20 21 // 首先,我们要先观察到返回值 savedState 代表 release 之前的 state 值 // 对于最简单的操作:先 lock.lock(),然后 condition1.await()。 // 那么 state 经过这个方法由 1 变为 0,锁释放,此方法返回 1 // 相应的,如果 lock 重入了 n 次,savedState == n // 如果这个方法失败,会将节点设置为"取消"状态,并抛出异常 IllegalMonitorStateException final int fullyRelease(Node node) { boolean failed = true; try { int savedState = getState(); // 这里使用了当前的 state 作为 release 的参数,也就是完全释放掉锁,将 state 置为 0 if (release(savedState)) { failed = false; return savedState; } else { throw new IllegalMonitorStateException(); } } finally { if (failed) node.waitStatus = Node.CANCELLED; } }
考虑一下,如果一个线程在不持有 lock 的基础上,就去调用 condition1.await() 方法,它能进入条件队列,但是在上面的这个方法中,由于它不持有锁,release(savedState) 这个方法肯定要返回 false,进入到异常分支,然后进入 finally 块设置 node.waitStatus = Node.CANCELLED,这个已经入队的节点之后会被后继的节点”请出去“。
4.1.3 等待进入阻塞队列 释放掉锁以后,接下来是这段,这边会自旋,如果发现自己还没到阻塞队列,那么挂起,等待被转移到阻塞队列。
1 2 3 4 5 6 7 8 9 10 int interruptMode = 0; // 如果不在阻塞队列中,注意了,是阻塞队列 while (!isOnSyncQueue(node)) { // 线程挂起 LockSupport.park(this); // 这里可以先不用看了,等看到它什么时候被 unpark 再说 if ((interruptMode = checkInterruptWhileWaiting(node)) != 0) break; }
isOnSyncQueue(Node node) 用于判断节点是否已经转移到阻塞队列了:
1 2 3 4 5 6 7 8 9 10 11 12 13 14 15 16 17 18 19 20 21 22 23 24 25 26 27 28 29 30 31 32 33 34 // 在节点入条件队列的时候,初始化时设置了 waitStatus = Node.CONDITION // 前面我提到,signal 的时候需要将节点从条件队列移到阻塞队列, // 这个方法就是判断 node 是否已经移动到阻塞队列了 final boolean isOnSyncQueue(Node node) { // 移动过去的时候,node 的 waitStatus 会置为 0,这个之后在说 signal 方法的时候会说到 // 如果 waitStatus 还是 Node.CONDITION,也就是 -2,那肯定就是还在条件队列中 // 如果 node 的前驱 prev 指向还是 null,说明肯定没有在 阻塞队列(prev是阻塞队列链表中使用的) if (node.waitStatus == Node.CONDITION || node.prev == null) return false; // 如果 node 已经有后继节点 next 的时候,那肯定是在阻塞队列了 if (node.next != null) return true; // 下面这个方法从阻塞队列的队尾开始从后往前遍历找,如果找到相等的,说明在阻塞队列,否则就是不在阻塞队列 // 可以通过判断 node.prev() != null 来推断出 node 在阻塞队列吗?答案是:不能。 // 这个可以看上篇 AQS 的入队方法,首先设置的是 node.prev 指向 tail, // 然后是 CAS 操作将自己设置为新的 tail,可是这次的 CAS 是可能失败的。 return findNodeFromTail(node); } // 从阻塞队列的队尾往前遍历,如果找到,返回 true private boolean findNodeFromTail(Node node) { Node t = tail; for (;;) { if (t == node) return true; if (t == null) return false; t = t.prev; } }
回到前面的循环,isOnSyncQueue(node) 返回 false 的话,那么进到 LockSupport.park(this):线程挂起。
4.2 signal() LockSupport.park(this); 把线程挂起了,等待唤醒。
唤醒操作通常由另一个线程来操作,就像生产者-消费者模式中,如果线程因为等待消费而挂起,那么当生产者生产了一个东西后,会调用 signal 唤醒正在等待的线程来消费。
1 2 3 4 5 6 7 8 9 10 11 12 13 14 15 16 17 18 19 20 21 22 23 24 25 26 27 28 29 30 31 32 33 34 35 36 37 38 39 40 41 42 43 44 45 46 47 48 // 唤醒等待了最久的线程 // 其实就是,将这个线程对应的 node 从条件队列转移到阻塞队列 public final void signal() { // 调用 signal 方法的线程必须持有当前的独占锁 if (!isHeldExclusively()) throw new IllegalMonitorStateException(); Node first = firstWaiter; if (first != null) doSignal(first); } // 从条件队列队头往后遍历,找出第一个需要转移的 node // 因为前面我们说过,有些线程会取消排队,但是可能还在队列中 private void doSignal(Node first) { do { // 将 firstWaiter 指向 first 节点后面的第一个,因为 first 节点马上要离开了 // 如果将 first 移除后,后面没有节点在等待了,那么需要将 lastWaiter 置为 null if ( (firstWaiter = first.nextWaiter) == null) lastWaiter = null; // 因为 first 马上要被移到阻塞队列了,和条件队列的链接关系在这里断掉 first.nextWaiter = null; } while (!transferForSignal(first) && (first = firstWaiter) != null); // 这里 while 循环,如果 first 转移不成功,那么选择 first 后面的第一个节点进行转移,依此类推 } // 将节点从条件队列转移到阻塞队列 // true 代表成功转移 // false 代表在 signal 之前,节点已经取消了 final boolean transferForSignal(Node node) { // CAS 如果失败,说明此 node 的 waitStatus 已不是 Node.CONDITION,说明节点已经取消, // 既然已经取消,也就不需要转移了,方法返回,转移后面一个节点 // 否则,将 waitStatus 置为 0 if (!compareAndSetWaitStatus(node, Node.CONDITION, 0)) return false; // enq(node): 自旋进入阻塞队列的队尾 // 注意,这里的返回值 p 是 node 在阻塞队列的前驱节点 Node p = enq(node); int ws = p.waitStatus; // ws > 0 说明 node 在阻塞队列中的前驱节点取消了等待锁,直接唤醒 node 对应的线程。唤醒之后会怎么样,后面再解释 // 如果 ws <= 0, 那么 compareAndSetWaitStatus 将会被调用,上篇介绍的时候说过,节点入队后,需要把前驱节点的状态设为 Node.SIGNAL(-1) if (ws > 0 || !compareAndSetWaitStatus(p, ws, Node.SIGNAL)) // 如果前驱节点取消或者 CAS 失败,会进到这里唤醒线程,之后的操作看下一节 LockSupport.unpark(node.thread); return true; }
正常情况下,ws > 0 || !compareAndSetWaitStatus(p, ws, Node.SIGNAL) 这句中,ws <= 0,而且 compareAndSetWaitStatus(p, ws, Node.SIGNAL) 会返回 true,所以一般也不会进去 if 语句块中唤醒 node 对应的线程。然后这个方法返回 true,也就意味着 signal 方法结束了,节点进入了阻塞队列。
假设发生了阻塞队列中的前驱节点取消等待,或者 CAS 失败,只要唤醒线程,让其进到下一步即可。
4.2.1 唤醒后检查中断状态 上一步 signal 之后,我们的线程由条件队列转移到了阻塞队列,之后就准备获取锁了。只要重新获取到锁了以后,继续往下执行。
等线程从挂起中恢复过来,继续往下看
1 2 3 4 5 6 7 8 int interruptMode = 0 ;while (!isOnSyncQueue(node)) { LockSupport.park(this ); if ((interruptMode = checkInterruptWhileWaiting(node)) != 0 ) break ; }
interruptMode 可以取值为 REINTERRUPT(1),THROW_IE(-1),0
REINTERRUPT: 代表 await 返回的时候,需要重新设置中断状态
THROW_IE: 代表 await 返回的时候,需要抛出 InterruptedException 异常
0 :说明在 await 期间,没有发生中断
有以下三种情况会让 LockSupport.park(this); 这句返回继续往下执行:
常规路径。signal -> 转移节点到阻塞队列 -> 获取了锁(unpark)
线程中断。在 park 的时候,另外一个线程对这个线程进行了中断
转移以后的前驱节点取消了,或者对前驱节点的CAS操作失败了
假唤醒。这个也是存在的,和 Object.wait() 类似,都有这个问题
线程唤醒后第一步是调用 checkInterruptWhileWaiting(node) 这个方法,此方法用于判断是否在线程挂起期间发生了中断,如果发生了中断,是 signal 调用之前中断的,还是 signal 之后发生的中断。
1 2 3 4 5 6 7 8 private int checkInterruptWhileWaiting (Node node) { return Thread.interrupted() ? (transferAfterCancelledWait(node) ? THROW_IE : REINTERRUPT) : 0 ; }
Thread.interrupted():如果当前线程已经处于中断状态,则返回 true,同时将中断状态重置为 false,所以,才有后续的 重新中断(REINTERRUPT) 的使用。
看看怎么判断是 signal 之前还是之后发生的中断:
1 2 3 4 5 6 7 8 9 10 11 12 13 14 15 16 17 18 19 20 final boolean transferAfterCancelledWait (Node node) { if (compareAndSetWaitStatus(node, Node.CONDITION, 0 )) { enq(node); return true ; } while (!isOnSyncQueue(node)) Thread.yield (); return false ; }
这里再说一遍,即使发生了中断,节点依然会转移到阻塞队列。
到这里,大家应该都知道这个 while 循环怎么退出了吧。要么中断,要么转移成功。
这里描绘了一个场景,本来有个线程,它是排在条件队列的后面的,但是因为它被中断了,那么它会被唤醒,然后它发现自己不是被 signal 的那个,但是它会自己主动去进入到阻塞队列。
4.2.2 获取独占锁 while 循环出来以后,下面是这段代码:
1 2 if (acquireQueued(node, savedState) && interruptMode != THROW_IE) interruptMode = REINTERRUPT;
由于 while 出来后,我们确定节点已经进入了阻塞队列,准备获取锁。
这里的 acquireQueued(node, savedState) 的第一个参数 node 之前已经经过 enq(node) 进入了队列,参数 savedState 是之前释放锁前的 state,这个方法返回的时候,代表当前线程获取了锁,而且 state == savedState了。
注意,前面我们说过,不管有没有发生中断,都会进入到阻塞队列,而 acquireQueued(node, savedState) 的返回值就是代表线程是否被中断。如果返回 true,说明被中断了,而且 interruptMode != THROW_IE,说明在 signal 之前就发生中断了,这里将 interruptMode 设置为 REINTERRUPT,用于待会重新中断。
继续往下:
1 2 3 4 if (node.nextWaiter != null ) unlinkCancelledWaiters(); if (interruptMode != 0 ) reportInterruptAfterWait(interruptMode);
node.nextWaiter != null 怎么满足?signal 的时候会将节点转移到阻塞队列,有一步是 node.nextWaiter = null,将断开节点和条件队列的联系。
可是,在判断发生中断的情况下,是 signal 之前还是之后发生的? 如果 signal 之前就中断了,也需要将节点进行转移到阻塞队列,这部分转移的时候,是没有设置 node.nextWaiter = null 的。如果有节点取消,也会调用 unlinkCancelledWaiters 这个方法,就是这里了。
4.2.3 处理中断状态 interruptMode 作用:
0:什么都不做,没有被中断过;
THROW_IE:await 方法抛出 InterruptedException 异常,因为它代表在 await() 期间发生了中断;
REINTERRUPT:重新中断当前线程,因为它代表 await() 期间没有被中断,而是 signal() 以后发生的中断1 2 3 4 5 6 7 private void reportInterruptAfterWait (int interruptMode) throws InterruptedException { if (interruptMode == THROW_IE) throw new InterruptedException (); else if (interruptMode == REINTERRUPT) selfInterrupt(); }
5. 带超时机制的 await 带超时机制的 await 方法:
1 2 3 4 5 6 public final long awaitNanos (long nanosTimeout) throws InterruptedException public final boolean awaitUntil (Date deadline) throws InterruptedException public final boolean await (long time, TimeUnit unit) throws InterruptedException
1 2 3 4 5 6 7 8 9 10 11 12 13 14 15 16 17 18 19 20 21 22 23 24 25 26 27 28 29 30 31 32 33 34 35 36 37 38 39 public final boolean await (long time, TimeUnit unit) throws InterruptedException { long nanosTimeout = unit.toNanos(time); if (Thread.interrupted()) throw new InterruptedException (); Node node = addConditionWaiter(); int savedState = fullyRelease(node); final long deadline = System.nanoTime() + nanosTimeout; boolean timedout = false ; int interruptMode = 0 ; while (!isOnSyncQueue(node)) { if (nanosTimeout <= 0L ) { timedout = transferAfterCancelledWait(node); break ; } if (nanosTimeout >= spinForTimeoutThreshold) LockSupport.parkNanos(this , nanosTimeout); if ((interruptMode = checkInterruptWhileWaiting(node)) != 0 ) break ; nanosTimeout = deadline - System.nanoTime(); } if (acquireQueued(node, savedState) && interruptMode != THROW_IE) interruptMode = REINTERRUPT; if (node.nextWaiter != null ) unlinkCancelledWaiters(); if (interruptMode != 0 ) reportInterruptAfterWait(interruptMode); return !timedout; }
超时的思路还是很简单的,不带超时参数的 await 是 park,然后等待别人唤醒。而现在就是调用 parkNanos 方法来休眠指定的时间,醒来后判断是否 signal 调用了,调用了就是没有超时,否则就是超时了。超时的话,自己来进行转移到阻塞队列,然后抢锁。
6. 不抛出 InterruptedException 的 await 1 2 3 4 5 6 7 8 9 10 11 12 public final void awaitUninterruptibly () { Node node = addConditionWaiter(); int savedState = fullyRelease(node); boolean interrupted = false ; while (!isOnSyncQueue(node)) { LockSupport.park(this ); if (Thread.interrupted()) interrupted = true ; } if (acquireQueued(node, savedState) || interrupted) selfInterrupt(); }
7. AQS取消排队 7.1 不处理中断 1 2 3 4 5 6 7 8 9 10 11 12 13 14 15 16 17 18 19 20 21 final boolean acquireQueued (final Node node, int arg) { boolean failed = true ; try { boolean interrupted = false ; for (;;) { final Node p = node.predecessor(); if (p == head && tryAcquire(arg)) { setHead(node); p.next = null ; failed = false ; return interrupted; } if (shouldParkAfterFailedAcquire(p, node) && parkAndCheckInterrupt()) interrupted = true ; } } finally { if (failed) cancelAcquire(node); } }
首先,到这个方法的时候,节点一定是入队成功的。
我把 parkAndCheckInterrupt() 代码贴过来:
1 2 3 4 private final boolean parkAndCheckInterrupt () { LockSupport.park(this ); return Thread.interrupted(); }
这两段代码联系起来看,是不是就清楚了。
如果我们要取消一个线程的排队,我们需要在另外一个线程中对其进行中断。比如某线程调用 lock() 老久不返回,我想中断它。一旦对其进行中断,此线程会从 LockSupport.park(this); 中唤醒,然后 Thread.interrupted(); 返回 true。
我们发现一个问题,即使是中断唤醒了这个线程,也就只是设置了 interrupted = true 然后继续下一次循环。而且,由于 Thread.interrupted(); 会清除中断状态,第二次进 parkAndCheckInterrupt 的时候,返回会是 false。
所以,在这个方法中,interrupted 只是用来记录是否发生了中断,然后用于方法返回值,其他没有做任何相关事情。
我们看外层方法怎么处理 acquireQueued 返回 false 的情况。
1 2 3 4 5 6 7 8 public final void acquire (int arg) { if (!tryAcquire(arg) && acquireQueued(addWaiter(Node.EXCLUSIVE), arg)) selfInterrupt(); } static void selfInterrupt () { Thread.currentThread().interrupt(); }
所以说,lock() 方法处理中断的方法就是,你中断归中断,我抢锁还是照样抢锁,几乎没关系,只是我抢到锁了以后,设置线程的中断状态而已,也不抛出任何异常出来。调用者获取锁后,可以去检查是否发生过中断,也可以不理会。
7.2 处理中断 我们来看 ReentrantLock 的另一个 lock 方法:
1 2 3 public void lockInterruptibly () throws InterruptedException { sync.acquireInterruptibly(1 ); }
方法上多了个 throws InterruptedException
1 2 3 4 5 6 7 public final void acquireInterruptibly (int arg) throws InterruptedException { if (Thread.interrupted()) throw new InterruptedException (); if (!tryAcquire(arg)) doAcquireInterruptibly(arg); }
继续往里:
1 2 3 4 5 6 7 8 9 10 11 12 13 14 15 16 17 18 19 20 21 22 23 24 25 private void doAcquireInterruptibly (int arg) throws InterruptedException { final Node node = addWaiter(Node.EXCLUSIVE); boolean failed = true ; try { for (;;) { final Node p = node.predecessor(); if (p == head && tryAcquire(arg)) { setHead(node); p.next = null ; failed = false ; return ; } if (shouldParkAfterFailedAcquire(p, node) && parkAndCheckInterrupt()) throw new InterruptedException (); } } finally { if (failed) cancelAcquire(node); } }
顺便说说 cancelAcquire 这个方法:
1 2 3 4 5 6 7 8 9 10 11 12 13 14 15 16 17 18 19 20 21 22 23 24 25 26 27 28 29 30 31 private void cancelAcquire (Node node) { if (node == null ) return ; node.thread = null ; Node pred = node.prev; while (pred.waitStatus > 0 ) node.prev = pred = pred.prev; Node predNext = pred.next; node.waitStatus = Node.CANCELLED; if (node == tail && compareAndSetTail(node, pred)) { compareAndSetNext(pred, predNext, null ); } else { int ws; if (pred != head && ((ws = pred.waitStatus) == Node.SIGNAL || (ws <= 0 && compareAndSetWaitStatus(pred, ws, Node.SIGNAL))) && pred.thread != null ) { Node next = node.next; if (next != null && next.waitStatus <= 0 ) compareAndSetNext(pred, predNext, next); } else { unparkSuccessor(node); } node.next = node; } }
节点取消,要把 waitStatus 设置为 Node.CANCELLED,会有非常多的情况被从阻塞队列中请出去,主动或被动。