正文:
SqlSession是mybatis的核心接口之一,是myabtis接口层的主要组成部分,对外提供了mybatis常用的api。myabtis提供了两个SqlSesion接口的实现,常用的实现类是DefaultSqlSession。它相当于一个数据库连接对象,在一个SqlSession中可以执行多条SQL语句。
1. 创建SqlSession 前面的两篇文章我们已经得到了SqlSessionFactory,那么SqlSession将由SqlSessionFactory进行创建。
1 SqlSession sqlSession=sqlSessionFactory.openSession();
我们就来看看这个SqlSessionFactory的 openSession方法是如何创建SqlSession对象的。根据上面的分析,这里的SqlSessionFactory类型对象其实是一个DefaultSqlSessionFactory对象,因此,需要到DefaultSqlSessionFactory类中去看openSession方法。
1
2
3
4
@Override public SqlSession openSession() { return openSessionFromDataSource(configuration.getDefaultExecutorType(), null, false); }
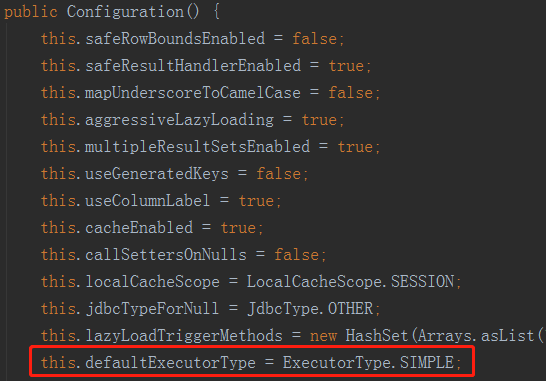
调用了openSessionFromDataSource 方法,并且第一个参数获取了默认的执行器类型,第二个参数为null,第三个参数为false,看看这个默认的执行器类型是啥
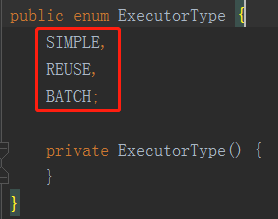
默认的执行器类型SIMPLE,我们跟进openSessionFromDataSource 方法
1
2
3
4
5
6
7
8
9
10
11
12
13
14
15
16
17
18
19
20
21
22
23
24
25
26
/** * ExecutorType 指定Executor的类型,分为三种:SIMPLE, REUSE, BATCH,默认使用的是SIMPLE * TransactionIsolationLevel 指定事务隔离级别,使用null,则表示使用数据库默认的事务隔离界别 * autoCommit 是否自动提交,传过来的参数为false,表示不自动提交 */ private SqlSession openSessionFromDataSource(ExecutorType execType, TransactionIsolationLevel level, boolean autoCommit) { Transaction tx = null; try { // 获取配置中的环境信息,包括了数据源信息、事务等 final Environment environment = configuration.getEnvironment(); // 创建事务工厂 final TransactionFactory transactionFactory = getTransactionFactoryFromEnvironment(environment); // 创建事务,配置事务属性 tx = transactionFactory.newTransaction(environment.getDataSource(), level, autoCommit); // 创建Executor,即执行器 // 它是真正用来Java和数据库交互操作的类,后面会展开说。 final Executor executor = configuration.newExecutor(tx, execType); // 创建DefaultSqlSession对象返回,其实现了SqlSession接口 return new DefaultSqlSession(configuration, executor, autoCommit); } catch (Exception e) { closeTransaction(tx); throw ExceptionFactory.wrapException("Error opening session. Cause: " + e, e); } finally { ErrorContext.instance().reset(); } }
主要包含以下几个步骤:
首先从configuration获取Environment对象,里面主要包含了DataSource和TransactionFactory对象
创建TransactionFactory
创建Transaction
从configuration获取Executor
构造DefaultSqlSession对象
我们先来看看常规的environment配置
1
2
3
4
5
6
7
8
9
10
11
12
13
14
15
16
17
18
19
20
21
22
23
//配置environment环境 <environments default="development"> <environment id="development"> /** 事务配置 type= JDBC、MANAGED * 1.JDBC:这个配置直接简单使用了JDBC的提交和回滚设置。它依赖于从数据源得到的连接来管理事务范围。 * 2.MANAGED:这个配置几乎没做什么。它从来不提交或回滚一个连接。 */ <transactionManager type="JDBC" /> /** 数据源类型:type = UNPOOLED、POOLED、JNDI * 1.UNPOOLED:这个数据源的实现是每次被请求时简单打开和关闭连接。 * 2.POOLED:这是JDBC连接对象的数据源连接池的实现。 * 3.JNDI:这个数据源的实现是为了使用如Spring或应用服务器这类的容器 */ <dataSource type="POOLED"> <property name="driver" value="com.mysql.jdbc.Driver" /> <property name="url" value="jdbc:mysql://localhost:3306/xhm" /> <property name="username" value="root" /> <property name="password" value="root" /> //默认连接事务隔离级别 <property name="defaultTransactionIsolationLevel" value=""/> </dataSource> </environment> </environments>
还记得前面文章是怎么解析environments的吗,我们简单的回顾一下
1
2
3
4
5
6
7
8
9
10
11
12
13
14
15
16
17
18
19
20
21
22
23
24
25
26
27
28
29
30
31
32
33
34
35
36
37
38
39
40
41
42
43
44
45
46
47
48
49
50
51
52
53
54
55
56
private void environmentsElement(XNode context) throws Exception { if (context != null) { if (environment == null) { // 获取 default 属性 environment = context.getStringAttribute("default"); } for (XNode child : context.getChildren()) { // 获取 id 属性 String id = child.getStringAttribute("id"); /* * 检测当前 environment 节点的 id 与其父节点 environments 的属性 default * 内容是否一致,一致则返回 true,否则返回 false * 将其default属性值与子元素environment的id属性值相等的子元素设置为当前使用的Environment对象 */ if (isSpecifiedEnvironment(id)) { // 将environment中的transactionManager标签转换为TransactionFactory对象 TransactionFactory txFactory = transactionManagerElement(child.evalNode("transactionManager")); // 将environment中的dataSource标签转换为DataSourceFactory对象 DataSourceFactory dsFactory = dataSourceElement(child.evalNode("dataSource")); // 创建 DataSource 对象 DataSource dataSource = dsFactory.getDataSource(); Environment.Builder environmentBuilder = new Environment.Builder(id) .transactionFactory(txFactory) .dataSource(dataSource); // 构建 Environment 对象,并设置到 configuration 中 configuration.setEnvironment(environmentBuilder.build()); } } } } private TransactionFactory transactionManagerElement(XNode context) throws Exception { if (context != null) { String type = context.getStringAttribute("type"); Properties props = context.getChildrenAsProperties(); //通过别名获取Class,并实例化 TransactionFactory factory = (TransactionFactory)this.resolveClass(type).newInstance(); factory.setProperties(props); return factory; } else { throw new BuilderException("Environment declaration requires a TransactionFactory."); } } private DataSourceFactory dataSourceElement(XNode context) throws Exception { if (context != null) { String type = context.getStringAttribute("type"); //通过别名获取Class,并实例化 Properties props = context.getChildrenAsProperties(); DataSourceFactory factory = (DataSourceFactory)this.resolveClass(type).newInstance(); factory.setProperties(props); return factory; } else { throw new BuilderException("Environment declaration requires a DataSourceFactory."); } }
1.1 获取TransactionFactory 我们的environment配置中transactionManager type=”JDBC”和dataSource type=”POOLED”,则生成的transactionManager为JdbcTransactionFactory,DataSourceFactory为PooledDataSourceFactory
我们回到openSessionFromDataSource,接着看看getTransactionFactoryFromEnvironment方法
1
2
3
private TransactionFactory getTransactionFactoryFromEnvironment(Environment environment) { return (TransactionFactory)(environment != null && environment.getTransactionFactory() != null ? environment.getTransactionFactory() : new ManagedTransactionFactory()); }
1.2 创建Transaction 很明显 environment.getTransactionFactory() 就是JdbcTransactionFactory, 看看这个工厂是如何创建Transaction的
1
2
3
public Transaction newTransaction(DataSource ds, TransactionIsolationLevel level, boolean autoCommit) { return new JdbcTransaction(ds, level, autoCommit); }
直接通过工厂方法创建了一个JdbcTransaction对象,并传参DataSource ,事务隔离级别null,自动提交false三个参数,我们来看看JdbcTransaction
1
2
3
4
5
6
7
8
9
10
11
12
13
14
15
16
17
18
19
20
21
22
23
24
25
26
27
28
29
30
31
32
33
34
35
36
37
38
39
40
41
42
43
44
45
46
47
48
49
50
51
52
53
54
55
56
57
58
59
60
61
62
63
64
65
66
67
68
69
70
71
72
73
74
75
76
77
public class JdbcTransaction implements Transaction { //数据库连接对象 protected Connection connection; //数据库DataSource protected DataSource dataSource; //数据库隔离级别 protected TransactionIsolationLevel level; //是否自动提交 protected boolean autoCommmit; public JdbcTransaction(DataSource ds, TransactionIsolationLevel desiredLevel, boolean desiredAutoCommit) { //设置dataSource和隔离级别,是否自动提交属性 //这里隔离级别传过来的是null,表示使用数据库默认隔离级别,自动提交为false,表示不自动提交 this.dataSource = ds; this.level = desiredLevel; this.autoCommmit = desiredAutoCommit; } public Connection getConnection() throws SQLException { if (this.connection == null) { this.openConnection(); } return this.connection; } //提交功能是通过Connection去完成的 public void commit() throws SQLException { if (this.connection != null && !this.connection.getAutoCommit()) { if (log.isDebugEnabled()) { log.debug("Committing JDBC Connection [" + this.connection + "]"); } this.connection.commit(); } } //回滚功能是通过Connection去完成的 public void rollback() throws SQLException { if (this.connection != null && !this.connection.getAutoCommit()) { if (log.isDebugEnabled()) { log.debug("Rolling back JDBC Connection [" + this.connection + "]"); } this.connection.rollback(); } } //关闭功能是通过Connection去完成的 public void close() throws SQLException { if (this.connection != null) { this.resetAutoCommit(); if (log.isDebugEnabled()) { log.debug("Closing JDBC Connection [" + this.connection + "]"); } this.connection.close(); } } //获取连接是通过dataSource来完成的 protected void openConnection() throws SQLException { if (log.isDebugEnabled()) { log.debug("Opening JDBC Connection"); } this.connection = this.dataSource.getConnection(); if (this.level != null) { this.connection.setTransactionIsolation(this.level.getLevel()); } this.setDesiredAutoCommit(this.autoCommmit); } }
JdbcTransaction主要维护了一个默认autoCommit为false的Connection对象,对事物的提交,回滚,关闭等都是接见通过Connection完成的。
1.3 创建Executor 1 2 3 4 5 6 7 8 9 10 11 12 13 14 15 16 17 18 19 20 21 22 23 24 25 26 27 28 29 30 //创建一个执行器,默认是SIMPLE public Executor newExecutor(Transaction transaction, ExecutorType executorType) { executorType = executorType == null ? defaultExecutorType : executorType; executorType = executorType == null ? ExecutorType.SIMPLE : executorType; Executor executor; //根据executorType来创建相应的执行器,Configuration默认是SIMPLE if (ExecutorType.BATCH == executorType) { executor = new BatchExecutor(this, transaction); } else if (ExecutorType.REUSE == executorType) { executor = new ReuseExecutor(this, transaction); } else { //创建SimpleExecutor实例,并且包含Configuration和transaction属性 executor = new SimpleExecutor(this, transaction); } //如果要求缓存,生成另一种CachingExecutor,装饰者模式,默认都是返回CachingExecutor /** * 二级缓存开关配置示例 * <settings> * <setting name="cacheEnabled" value="true"/> * </settings> */ if (cacheEnabled) { //CachingExecutor使用装饰器模式,将executor的功能添加上了二级缓存的功能,二级缓存会单独文章来讲 executor = new CachingExecutor(executor); } //此处调用插件,通过插件可以改变Executor行为,此处我们后面单独文章讲 executor = (Executor) interceptorChain.pluginAll(executor); return executor; }
executor包含了Configuration和刚刚创建的Transaction,默认的执行器为SimpleExecutor,如果开启了二级缓存(默认开启),则CachingExecutor会包装SimpleExecutor,然后依次调用拦截器的plugin方法返回一个被代理过的Executor对象。
CachingExecutor 对象里面包含了刚创建的SimpleExecutor ,后面文章我们会及具体讲这个类
1 2 3 4 5 6 7 8 9 10 public class CachingExecutor implements Executor { private Executor delegate; private TransactionalCacheManager tcm = new TransactionalCacheManager(); public CachingExecutor(Executor delegate) { this.delegate = delegate; delegate.setExecutorWrapper(this); } //略 }
1.4 构造DefaultSqlSession对象 1 new DefaultSqlSession(this.configuration, executor, autoCommit);
传参configuration和刚生成的executor,我们来简单看看
1 2 3 4 5 6 7 8 9 10 11 12 13 14 15 16 17 18 19 20 21 22 23 24 25 26 27 28 29 30 31 32 33 34 35 36 37 38 39 40 41 42 43 44 45 46 47 48 49 50 51 52 53 54 55 56 57 58 59 60 61 62 63 64 65 66 public class DefaultSqlSession implements SqlSession { /** * mybatis全局配置新 */ private final Configuration configuration; /** * SQL执行器 */ private final Executor executor; /** * 是否自动提交 */ private final boolean autoCommit; private List<Cursor<?>> cursorList; public DefaultSqlSession(Configuration configuration, Executor executor, boolean autoCommit) { this.configuration = configuration; this.executor = executor; this.dirty = false; this.autoCommit = autoCommit; } @Override public <T> T selectOne(String statement) { return this.<T>selectOne(statement, null); } @Override public <T> T selectOne(String statement, Object parameter) { // Popular vote was to return null on 0 results and throw exception on too many. List<T> list = this.<T>selectList(statement, parameter); if (list.size() == 1) { return list.get(0); } else if (list.size() > 1) { throw new TooManyResultsException("Expected one result (or null) to be returned by selectOne(), but found: " + list.size()); } else { return null; } } @Override public <E> List<E> selectList(String statement) { return this.selectList(statement, null); } @Override public <E> List<E> selectList(String statement, Object parameter) { return this.selectList(statement, parameter, RowBounds.DEFAULT); } @Override public <E> List<E> selectList(String statement, Object parameter, RowBounds rowBounds) { try { MappedStatement ms = configuration.getMappedStatement(statement); return executor.query(ms, wrapCollection(parameter), rowBounds, Executor.NO_RESULT_HANDLER); } catch (Exception e) { throw ExceptionFactory.wrapException("Error querying database. Cause: " + e, e); } finally { ErrorContext.instance().reset(); } } //略....update等方法 }
SqlSession的所有查询接口最后都归结位Exector的方法调用。后面文章我们来分析其调用流程