资料来源:
https://github.com/DerekYRC/mini-spring?tab=readme-ov-file
最简单的bean容器 定义一个简单的bean容器BeanFactory,内部包含一个map用以保存bean,只有注册bean和获取bean两个方法。
1
2
3
4
5
6
7
8
9
10
11
public class BeanFactory { private Map<String, Object> beanMap = new HashMap<>(); public void registerBean(String name, Object bean) { beanMap.put(name, bean); } public Object getBean(String name) { return beanMap.get(name); } }
测试:
1
2
3
4
5
6
7
8
9
10
11
12
13
14
15
16
17
18
public class SimpleBeanContainerTest { @Test public void testGetBean() throws Exception { BeanFactory beanFactory = new BeanFactory(); beanFactory.registerBean("helloService", new HelloService()); HelloService helloService = (HelloService) beanFactory.getBean("helloService"); assertThat(helloService).isNotNull(); assertThat(helloService.sayHello()).isEqualTo("hello"); } class HelloService { public String sayHello() { System.out.println("hello"); return "hello"; } } }
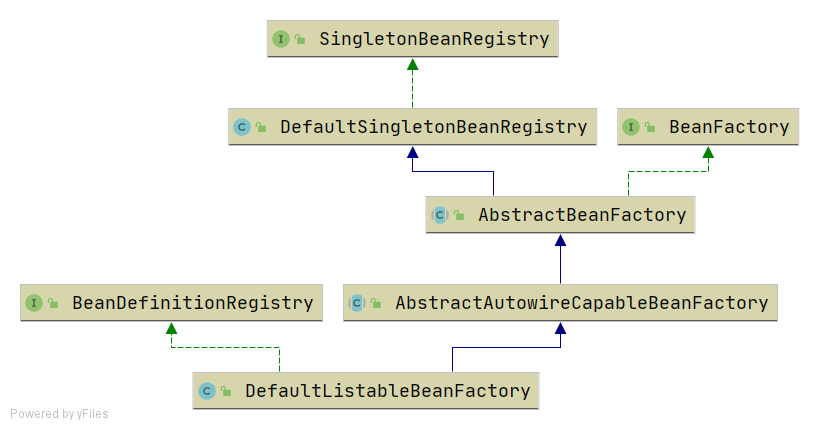
BeanDefinition和BeanDefinitionRegistry 主要增加如下类:
BeanDefinition,顾名思义,用于定义bean信息的类,包含bean的class类型、构造参数、属性值等信息,每个bean对应一个BeanDefinition的实例。简化BeanDefinition仅包含bean的class类型。
BeanDefinitionRegistry,BeanDefinition注册表接口,定义注册BeanDefinition的方法。
SingletonBeanRegistry及其实现类DefaultSingletonBeanRegistry,定义添加和获取单例bean的方法。
bean容器作为BeanDefinitionRegistry和SingletonBeanRegistry的实现类,具备两者的能力。向bean容器中注册BeanDefinition后,使用bean时才会实例化。
测试:
1
2
3
4
5
6
7
8
9
10
11
12
13
14
15
16
17
18
19
public class BeanDefinitionAndBeanDefinitionRegistryTest { @Test public void testBeanFactory() throws Exception { DefaultListableBeanFactory beanFactory = new DefaultListableBeanFactory(); BeanDefinition beanDefinition = new BeanDefinition(HelloService.class); beanFactory.registerBeanDefinition("helloService", beanDefinition); HelloService helloService = (HelloService) beanFactory.getBean("helloService"); helloService.sayHello(); } } class HelloService { public String sayHello() { System.out.println("hello"); return "hello"; } }
注意:两个map:private Map<String, Object> singletonObjects = new HashMap<>();和private Map<String, BeanDefinition> beanDefinitionMap = new HashMap<>();,Registry结尾的接口分别是定义了对两个map的行为;
Bean实例化策略InstantiationStrategy 现在bean是在AbstractAutowireCapableBeanFactory.doCreateBean方法中用beanClass.newInstance()来实例化,仅适用于bean有无参构造函数的情况。
针对bean的实例化,抽象出一个实例化策略的接口InstantiationStrategy,有两个实现类:
SimpleInstantiationStrategy,使用bean的构造函数来实例化
CglibSubclassingInstantiationStrategy,使用CGLIB动态生成子类
为bean填充属性 在BeanDefinition中增加和bean属性对应的PropertyValues,实例化bean之后,为bean填充属性(AbstractAutowireCapableBeanFactory#applyPropertyValues)。
测试:
1
2
3
4
5
6
7
8
9
10
11
12
13
14
15
16
17
public class PopulateBeanWithPropertyValuesTest { @Test public void testPopulateBeanWithPropertyValues() throws Exception { DefaultListableBeanFactory beanFactory = new DefaultListableBeanFactory(); PropertyValues propertyValues = new PropertyValues(); propertyValues.addPropertyValue(new PropertyValue("name", "derek")); propertyValues.addPropertyValue(new PropertyValue("age", 18)); BeanDefinition beanDefinition = new BeanDefinition(Person.class, propertyValues); beanFactory.registerBeanDefinition("person", beanDefinition); Person person = (Person) beanFactory.getBean("person"); System.out.println(person); assertThat(person.getName()).isEqualTo("derek"); assertThat(person.getAge()).isEqualTo(18); } }
为bean注入bean 增加BeanReference类,包装一个bean对另一个bean的引用。实例化beanA后填充属性时,若PropertyValue#value为BeanReference,引用beanB,则先去实例化beanB。 由于不想增加代码的复杂度提高理解难度,暂时不支持循环依赖,后面会在高级篇中解决该问题。
1
2
3
4
5
6
7
8
9
10
11
12
13
14
15
16
17
18
protected void applyPropertyValues(String beanName, Object bean, BeanDefinition beanDefinition) { try { for (PropertyValue propertyValue : beanDefinition.getPropertyValues().getPropertyValues()) { String name = propertyValue.getName(); Object value = propertyValue.getValue(); if (value instanceof BeanReference) { // beanA依赖beanB,先实例化beanB BeanReference beanReference = (BeanReference) value; value = getBean(beanReference.getBeanName()); } //通过反射设置属性 BeanUtil.setFieldValue(bean, name, value); } } catch (Exception ex) { throw new BeansException("Error setting property values for bean: " + beanName, ex); } }
测试:
1
2
3
4
5
6
7
8
9
10
11
12
13
14
15
16
17
18
19
20
21
22
23
24
25
26
27
28
29
30
31
32
33
34
35
public class PopulateBeanWithPropertyValuesTest { /** * 为bean注入bean * * @throws Exception */ @Test public void testPopulateBeanWithBean() throws Exception { DefaultListableBeanFactory beanFactory = new DefaultListableBeanFactory(); //注册Car实例 PropertyValues propertyValuesForCar = new PropertyValues(); propertyValuesForCar.addPropertyValue(new PropertyValue("brand", "porsche")); BeanDefinition carBeanDefinition = new BeanDefinition(Car.class, propertyValuesForCar); beanFactory.registerBeanDefinition("car", carBeanDefinition); //注册Person实例 PropertyValues propertyValuesForPerson = new PropertyValues(); propertyValuesForPerson.addPropertyValue(new PropertyValue("name", "derek")); propertyValuesForPerson.addPropertyValue(new PropertyValue("age", 18)); //Person实例依赖Car实例 propertyValuesForPerson.addPropertyValue(new PropertyValue("car", new BeanReference("car"))); BeanDefinition beanDefinition = new BeanDefinition(Person.class, propertyValuesForPerson); beanFactory.registerBeanDefinition("person", beanDefinition); Person person = (Person) beanFactory.getBean("person"); System.out.println(person); assertThat(person.getName()).isEqualTo("derek"); assertThat(person.getAge()).isEqualTo(18); Car car = person.getCar(); assertThat(car).isNotNull(); assertThat(car.getBrand()).isEqualTo("porsche"); } }
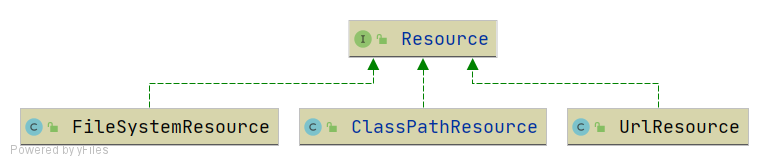
资源和资源加载器 Resource是资源的抽象和访问接口,简单写了三个实现类
FileSystemResource,文件系统资源的实现类
ClassPathResource,classpath下资源的实现类
UrlResource,对java.net.URL进行资源定位的实现类
ResourceLoader接口则是资源查找定位策略的抽象,DefaultResourceLoader是其默认实现类
测试:
1
2
3
4
5
6
7
8
9
10
11
12
13
14
15
16
17
18
19
20
21
22
23
24
25
26
27
28
29
public class ResourceAndResourceLoaderTest { @Test public void testResourceLoader() throws Exception { DefaultResourceLoader resourceLoader = new DefaultResourceLoader(); //加载classpath下的资源 Resource resource = resourceLoader.getResource("classpath:hello.txt"); InputStream inputStream = resource.getInputStream(); String content = IoUtil.readUtf8(inputStream); System.out.println(content); assertThat(content).isEqualTo("hello world"); //加载文件系统资源 resource = resourceLoader.getResource("src/test/resources/hello.txt"); assertThat(resource instanceof FileSystemResource).isTrue(); inputStream = resource.getInputStream(); content = IoUtil.readUtf8(inputStream); System.out.println(content); assertThat(content).isEqualTo("hello world"); //加载url资源 resource = resourceLoader.getResource("https://www.baidu.com"); assertThat(resource instanceof UrlResource).isTrue(); inputStream = resource.getInputStream(); content = IoUtil.readUtf8(inputStream); System.out.println(content); } }
在xml中定义bean 有了资源加载器,就可以在xml格式配置文件中声明式地定义bean的信息,资源加载器读取xml文件,解析出bean的信息,然后往容器中注册BeanDefinition。
BeanDefinitionReader是读取bean定义信息的抽象接口,XmlBeanDefinitionReader是从xml文件中读取的实现类。BeanDefinitionReader需要有获取资源的能力,且读取bean定义信息后需要往容器中注册BeanDefinition,因此BeanDefinitionReader的抽象实现类AbstractBeanDefinitionReader拥有ResourceLoader和BeanDefinitionRegistry两个属性。
由于从xml文件中读取的内容是String类型,所以属性仅支持String类型和引用其他Bean。后面会讲到类型转换器,实现类型转换。
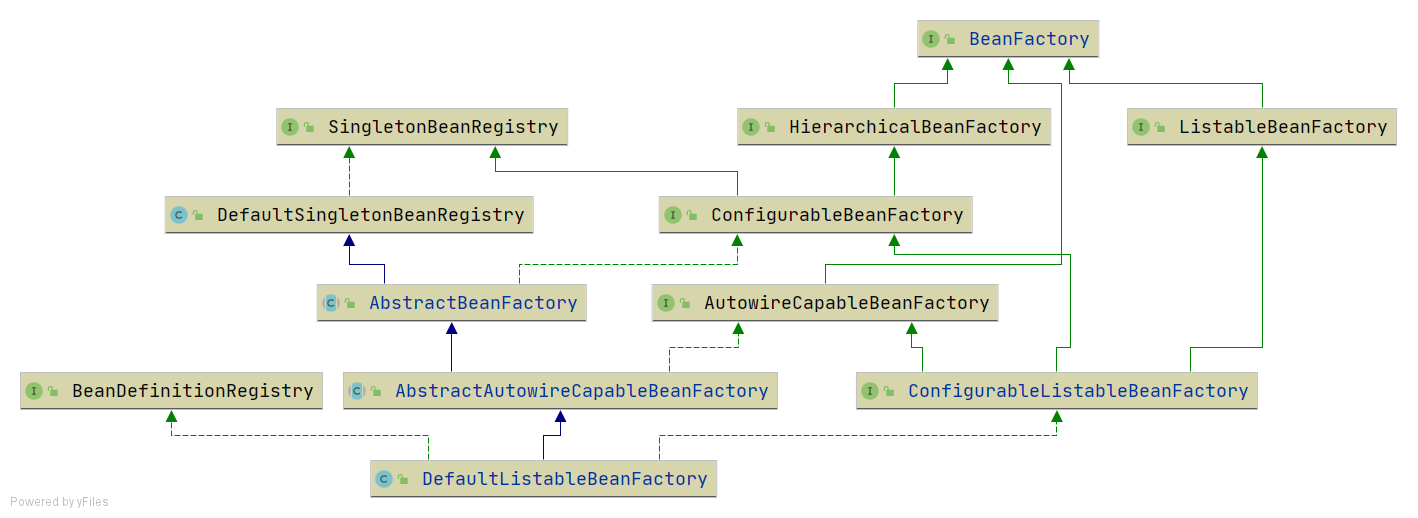
为了方便后面的讲解和功能实现,并且尽量保持和spring中BeanFactory的继承层次一致,对BeanFactory的继承层次稍微做了调整。
测试: bean定义文件spring.xml
1
2
3
4
5
6
7
8
9
10
11
12
13
14
15
16
17
18
19
<?xml version="1.0" encoding="UTF-8"?> <beans xmlns="http://www.springframework.org/schema/beans" xmlns:xsi="http://www.w3.org/2001/XMLSchema-instance" xmlns:context="http://www.springframework.org/schema/context" xsi:schemaLocation="http://www.springframework.org/schema/beans http://www.springframework.org/schema/beans/spring-beans.xsd http://www.springframework.org/schema/context http://www.springframework.org/schema/context/spring-context-4.0.xsd"> <bean id="person" class="org.springframework.test.bean.Person"> <property name="name" value="derek"/> <property name="car" ref="car"/> </bean> <bean id="car" class="org.springframework.test.bean.Car"> <property name="brand" value="porsche"/> </bean> </beans>
1
2
3
4
5
6
7
8
9
10
11
12
13
14
15
16
17
18
public class XmlFileDefineBeanTest { @Test public void testXmlFile() throws Exception { DefaultListableBeanFactory beanFactory = new DefaultListableBeanFactory(); XmlBeanDefinitionReader beanDefinitionReader = new XmlBeanDefinitionReader(beanFactory); beanDefinitionReader.loadBeanDefinitions("classpath:spring.xml"); Person person = (Person) beanFactory.getBean("person"); System.out.println(person); assertThat(person.getName()).isEqualTo("derek"); assertThat(person.getCar().getBrand()).isEqualTo("porsche"); Car car = (Car) beanFactory.getBean("car"); System.out.println(car); assertThat(car.getBrand()).isEqualTo("porsche"); } }
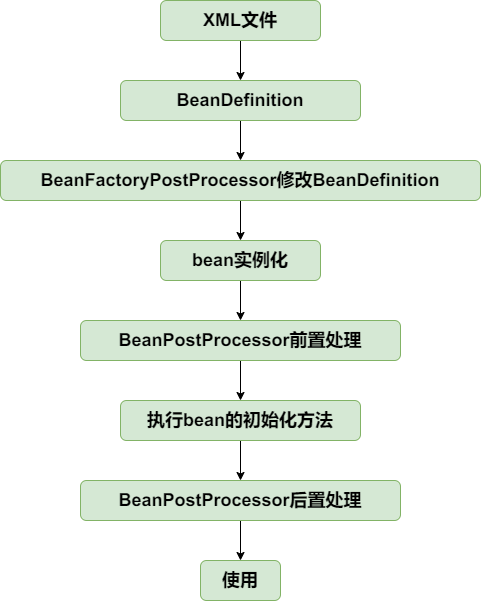
BeanFactoryPostProcessor和BeanPostProcessor BeanFactoryPostProcessor和BeanPostProcessor是spring框架中具有重量级地位的两个接口,理解了这两个接口的作用,基本就理解spring的核心原理了。为了降低理解难度分两个小节实现。
BeanFactoryPostProcessor是spring提供的容器扩展机制,允许我们在bean实例化之前修改bean的定义信息即BeanDefinition的信息。其重要的实现类有PropertyPlaceholderConfigurer和CustomEditorConfigurer,PropertyPlaceholderConfigurer的作用是用properties文件的配置值替换xml文件中的占位符,CustomEditorConfigurer的作用是实现类型转换。BeanFactoryPostProcessor的实现比较简单,看单元测试BeanFactoryPostProcessorAndBeanPostProcessorTest#testBeanFactoryPostProcessor。
1
2
3
4
5
6
7
8
9
10
11
12
13
14
15
@Test public void testBeanFactoryPostProcessor() throws Exception { DefaultListableBeanFactory beanFactory = new DefaultListableBeanFactory(); XmlBeanDefinitionReader beanDefinitionReader = new XmlBeanDefinitionReader(beanFactory); beanDefinitionReader.loadBeanDefinitions("classpath:spring.xml"); //在所有BeanDefintion加载完成后,但在bean实例化之前,修改BeanDefinition的属性值 CustomBeanFactoryPostProcessor beanFactoryPostProcessor = new CustomBeanFactoryPostProcessor(); beanFactoryPostProcessor.postProcessBeanFactory(beanFactory); Person person = (Person) beanFactory.getBean("person"); System.out.println(person); //name属性在CustomBeanFactoryPostProcessor中被修改为ivy assertThat(person.getName()).isEqualTo("ivy"); }
BeanPostProcessor也是spring提供的容器扩展机制,不同于BeanFactoryPostProcessor的是,BeanPostProcessor在bean实例化后修改bean或替换bean。BeanPostProcessor是后面实现AOP的关键。
BeanPostProcessor的两个方法分别在bean执行初始化方法(后面实现)之前和之后执行,理解其实现重点看单元测试BeanFactoryPostProcessorAndBeanPostProcessorTest#testBeanPostProcessor和AbstractAutowireCapableBeanFactory#initializeBean方法,有些地方做了微调,可不必关注。
1
2
3
4
5
6
7
8
9
10
11
12
13
14
15
16
17
18
19
20
21
22
23
24
public interface BeanPostProcessor { /** * 在bean执行初始化方法之前执行此方法 */ Object postProcessBeforeInitialization(Object bean, String beanName) throws BeansException; /** * 在bean执行初始化方法之后执行此方法 */ Object postProcessAfterInitialization(Object bean, String beanName) throws BeansException; } // org.springframework.beans.factory.support.AbstractAutowireCapableBeanFactory#initializeBean protected Object initializeBean(String beanName, Object bean, BeanDefinition beanDefinition) { //执行BeanPostProcessor的前置处理 Object wrappedBean = applyBeanPostProcessorsBeforeInitialization(bean, beanName); //TODO 后面会在此处执行bean的初始化方法 invokeInitMethods(beanName, wrappedBean, beanDefinition); //执行BeanPostProcessor的后置处理 wrappedBean = applyBeanPostProcessorsAfterInitialization(bean, beanName); return wrappedBean; }
下一节将引入ApplicationContext,能自动识别BeanFactoryPostProcessor和BeanPostProcessor,就可以在xml文件中配置而不需要手动添加到BeanFactory了。
测试:
1
2
3
4
5
6
7
8
9
10
11
12
13
14
15
16
17
18
public class BeanFactoryProcessorAndBeanPostProcessorTest { @Test public void testBeanPostProcessor() throws Exception { DefaultListableBeanFactory beanFactory = new DefaultListableBeanFactory(); XmlBeanDefinitionReader beanDefinitionReader = new XmlBeanDefinitionReader(beanFactory); beanDefinitionReader.loadBeanDefinitions("classpath:spring.xml"); //添加bean实例化后的处理器 CustomerBeanPostProcessor customerBeanPostProcessor = new CustomerBeanPostProcessor(); beanFactory.addBeanPostProcessor(customerBeanPostProcessor); Car car = (Car) beanFactory.getBean("car"); System.out.println(car); //brand属性在CustomerBeanPostProcessor中被修改为lamborghini assertThat(car.getBrand()).isEqualTo("lamborghini"); } }
应用上下文ApplicationContext 应用上下文ApplicationContext是spring中较之于BeanFactory更为先进的IOC容器,ApplicationContext除了拥有BeanFactory的所有功能外,还支持特殊类型bean如上一节中的BeanFactoryPostProcessor和BeanPostProcessor的自动识别、资源加载、容器事件和监听器、国际化支持、单例bean自动初始化等。
BeanFactory是spring的基础设施,面向spring本身;而ApplicationContext面向spring的使用者,应用场合使用ApplicationContext。
具体实现查看AbstractApplicationContext#refresh方法即可。注意BeanFactoryPostProcessor和BeanPostProcessor的自动识别,这样就可以在xml文件中配置二者而不需要像上一节一样手动添加到容器中了。
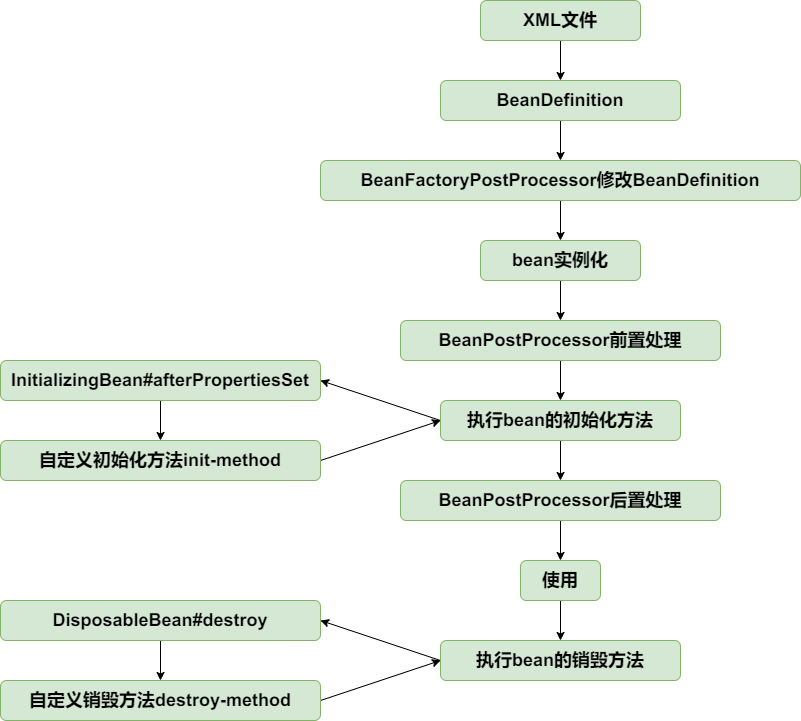
从bean的角度看,目前生命周期如下:
测试:见ApplicationContextTest
1
2
3
4
5
6
7
8
9
10
11
12
13
14
@Test public void testApplicationContext() throws Exception { ClassPathXmlApplicationContext applicationContext = new ClassPathXmlApplicationContext("classpath:spring.xml"); Person person = applicationContext.getBean("person", Person.class); System.out.println(person); //name属性在CustomBeanFactoryPostProcessor中被修改为ivy assertThat(person.getName()).isEqualTo("ivy"); Car car = applicationContext.getBean("car", Car.class); System.out.println(car); //brand属性在CustomerBeanPostProcessor中被修改为lamborghini assertThat(car.getBrand()).isEqualTo("lamborghini"); }
Bean的初始化和销毁方法 在spring中,定义bean的初始化和销毁方法有三种方法:
在xml文件中制定init-method和destroy-method
继承自InitializingBean和DisposableBean
在方法上加注解PostConstruct和PreDestroy
第三种通过BeanPostProcessor实现,在扩展篇中实现,本节只实现前两种。
1、针对第一种在xml文件中指定初始化和销毁方法的方式,在BeanDefinition中增加属性initMethodName和destroyMethodName。
2、初始化方法在AbstractAutowireCapableBeanFactory#invokeInitMethods执行。DefaultSingletonBeanRegistry中增加属性disposableBeans保存拥有销毁方法的bean,拥有销毁方法的bean在AbstractAutowireCapableBeanFactory#registerDisposableBeanIfNecessary中注册到disposableBeans中。
1
2
3
4
5
6
7
8
9
public interface InitializingBean { void afterPropertiesSet() throws Exception; } public interface DisposableBean { void destroy() throws Exception; }
为了确保销毁方法在虚拟机关闭之前执行,向虚拟机中注册一个钩子方法,查看AbstractApplicationContext#registerShutdownHook(非web应用需要手动调用该方法)。当然也可以手动调用ApplicationContext#close方法关闭容器。
到此为止,bean的生命周期如下:
测试: init-and-destroy-method.xml
1
2
3
4
5
6
7
8
9
10
11
12
13
14
15
16
17
18
19
<?xml version="1.0" encoding="UTF-8"?> <beans xmlns="http://www.springframework.org/schema/beans" xmlns:xsi="http://www.w3.org/2001/XMLSchema-instance" xmlns:context="http://www.springframework.org/schema/context" xsi:schemaLocation="http://www.springframework.org/schema/beans http://www.springframework.org/schema/beans/spring-beans.xsd http://www.springframework.org/schema/context http://www.springframework.org/schema/context/spring-context-4.0.xsd"> <bean id="person" class="org.springframework.test.bean.Person" init-method="customInitMethod" destroy-method="customDestroyMethod"> <property name="name" value="derek"/> <property name="car" ref="car"/> </bean> <bean id="car" class="org.springframework.test.bean.Car"> <property name="brand" value="porsche"/> </bean> </beans>
1
2
3
4
5
6
7
8
9
10
11
12
13
14
15
16
17
18
19
20
21
22
23
24
25
26
27
28
public class Person implements InitializingBean, DisposableBean { private String name; private int age; private Car car; public void customInitMethod() { System.out.println("I was born in the method named customInitMethod"); } public void customDestroyMethod() { System.out.println("I died in the method named customDestroyMethod"); } @Override public void afterPropertiesSet() throws Exception { System.out.println("I was born in the method named afterPropertiesSet"); } @Override public void destroy() throws Exception { System.out.println("I died in the method named destroy"); } //setter and getter }
1
2
3
4
5
6
7
8
public class InitAndDestoryMethodTest { @Test public void testInitAndDestroyMethod() throws Exception { ClassPathXmlApplicationContext applicationContext = new ClassPathXmlApplicationContext("classpath:init-and-destroy-method.xml"); applicationContext.registerShutdownHook(); //或者手动关闭 applicationContext.close(); } }
Aware接口 Aware是感知、意识的意思,Aware接口是标记性接口,其实现子类能感知容器相关的对象。常用的Aware接口有BeanFactoryAware和ApplicationContextAware,分别能让其实现者感知所属的BeanFactory和ApplicationContext。
让实现BeanFactoryAware接口的类能感知所属的BeanFactory,实现比较简单,查看AbstractAutowireCapableBeanFactory#initializeBean前三行。
1
2
3
4
5
6
7
protected Object initializeBean(String beanName, Object bean, BeanDefinition beanDefinition) { if (bean instanceof BeanFactoryAware) { ((BeanFactoryAware) bean).setBeanFactory(this); } ··· ··· return wrappedBean; }
实现ApplicationContextAware的接口感知ApplicationContext,是通过BeanPostProcessor。由bean的生命周期可知,bean实例化后会经过BeanPostProcessor的前置处理和后置处理。定义一个BeanPostProcessor的实现类ApplicationContextAwareProcessor,在AbstractApplicationContext#refresh方法中加入到BeanFactory中,在前置处理中为bean设置所属的ApplicationContext。
1
2
3
4
5
6
7
8
9
10
11
12
13
14
15
16
17
18
19
20
21
22
# ApplicationContextAwareProcessor#postProcessBeforeInitialization @Override public Object postProcessBeforeInitialization(Object bean, String beanName) throws BeansException { if (bean instanceof ApplicationContextAware) { ((ApplicationContextAware) bean).setApplicationContext(applicationContext); } return bean; } # AbstractApplicationContext#refresh @Override public void refresh() throws BeansException { ··· ··· //添加ApplicationContextAwareProcessor,让继承自ApplicationContextAware的bean能感知bean beanFactory.addBeanPostProcessor(new ApplicationContextAwareProcessor(this)); ··· ··· }
改用dom4j解析xml文件。
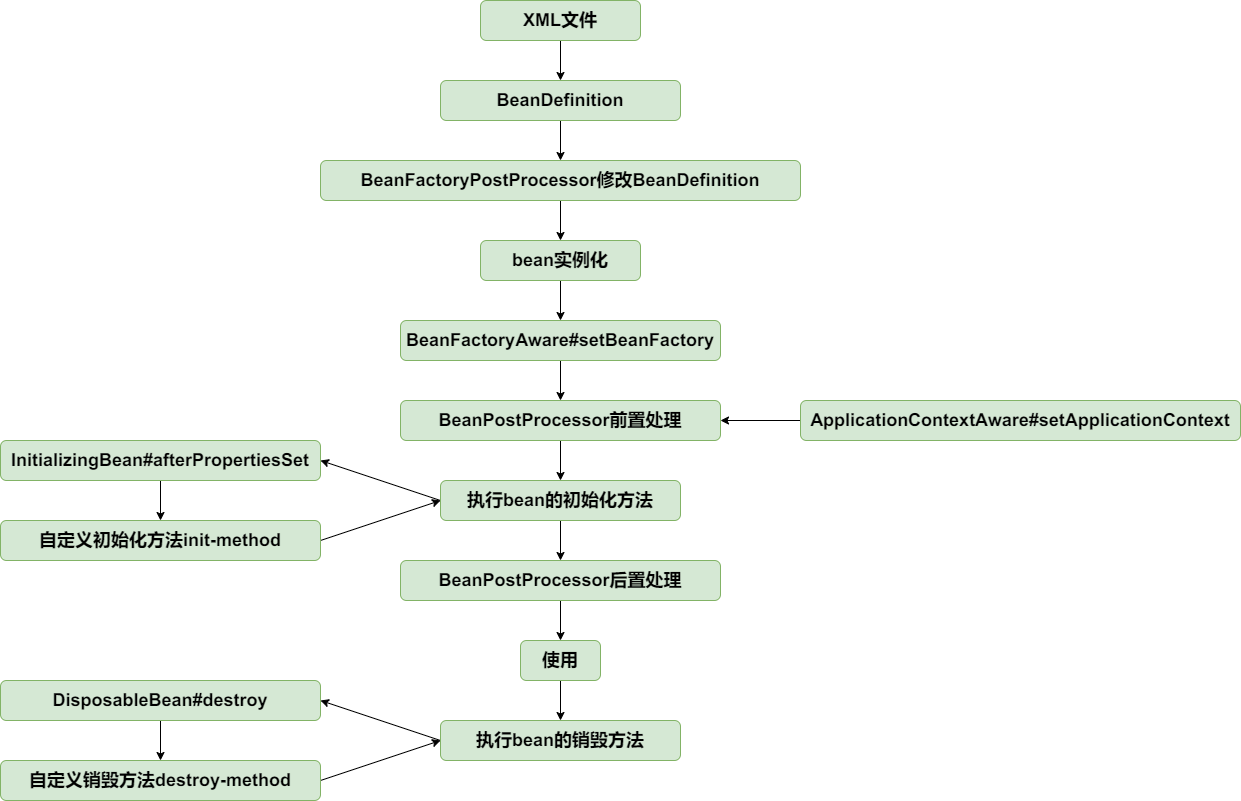
至止,bean的生命周期如下:
测试: spring.xml
1
2
3
4
5
6
7
8
9
10
11
12
<?xml version="1.0" encoding="UTF-8"?> <beans xmlns="http://www.springframework.org/schema/beans" xmlns:xsi="http://www.w3.org/2001/XMLSchema-instance" xmlns:context="http://www.springframework.org/schema/context" xsi:schemaLocation="http://www.springframework.org/schema/beans http://www.springframework.org/schema/beans/spring-beans.xsd http://www.springframework.org/schema/context http://www.springframework.org/schema/context/spring-context-4.0.xsd"> <bean id="helloService" class="org.springframework.test.service.HelloService"/> </beans>
1
2
3
4
5
6
7
8
9
10
11
12
13
14
15
16
17
18
19
20
21
22
23
24
public class HelloService implements ApplicationContextAware, BeanFactoryAware { private ApplicationContext applicationContext; private BeanFactory beanFactory; @Override public void setBeanFactory(BeanFactory beanFactory) throws BeansException { this.beanFactory = beanFactory; } @Override public void setApplicationContext(ApplicationContext applicationContext) throws BeansException { this.applicationContext = applicationContext; } public ApplicationContext getApplicationContext() { return applicationContext; } public BeanFactory getBeanFactory() { return beanFactory; } }
1
2
3
4
5
6
7
8
9
10
public class AwareInterfaceTest { @Test public void test() throws Exception { ClassPathXmlApplicationContext applicationContext = new ClassPathXmlApplicationContext("classpath:spring.xml"); HelloService helloService = applicationContext.getBean("helloService", HelloService.class); assertThat(helloService.getApplicationContext()).isNotNull(); assertThat(helloService.getBeanFactory()).isNotNull(); } }
bean作用域,增加prototype的支持 每次向容器获取prototype作用域bean时,容器都会创建一个新的实例。在BeanDefinition中增加描述bean的作用域的字段scope,创建prototype作用域bean时(AbstractAutowireCapableBeanFactory#doCreateBean),不往singletonObjects中增加该bean。prototype作用域bean不执行销毁方法,查看AbstractAutowireCapableBeanFactory#registerDisposableBeanIfNecessary方法。
1
2
3
4
5
6
7
8
9
// AbstractAutowireCapableBeanFactory#registerDisposableBeanIfNecessary protected void registerDisposableBeanIfNecessary(String beanName, Object bean, BeanDefinition beanDefinition) { //只有singleton类型bean会执行销毁方法 if (beanDefinition.isSingleton()) { if (bean instanceof DisposableBean || StrUtil.isNotEmpty(beanDefinition.getDestroyMethodName())) { registerDisposableBean(beanName, new DisposableBeanAdapter(bean, beanName, beanDefinition)); } } }
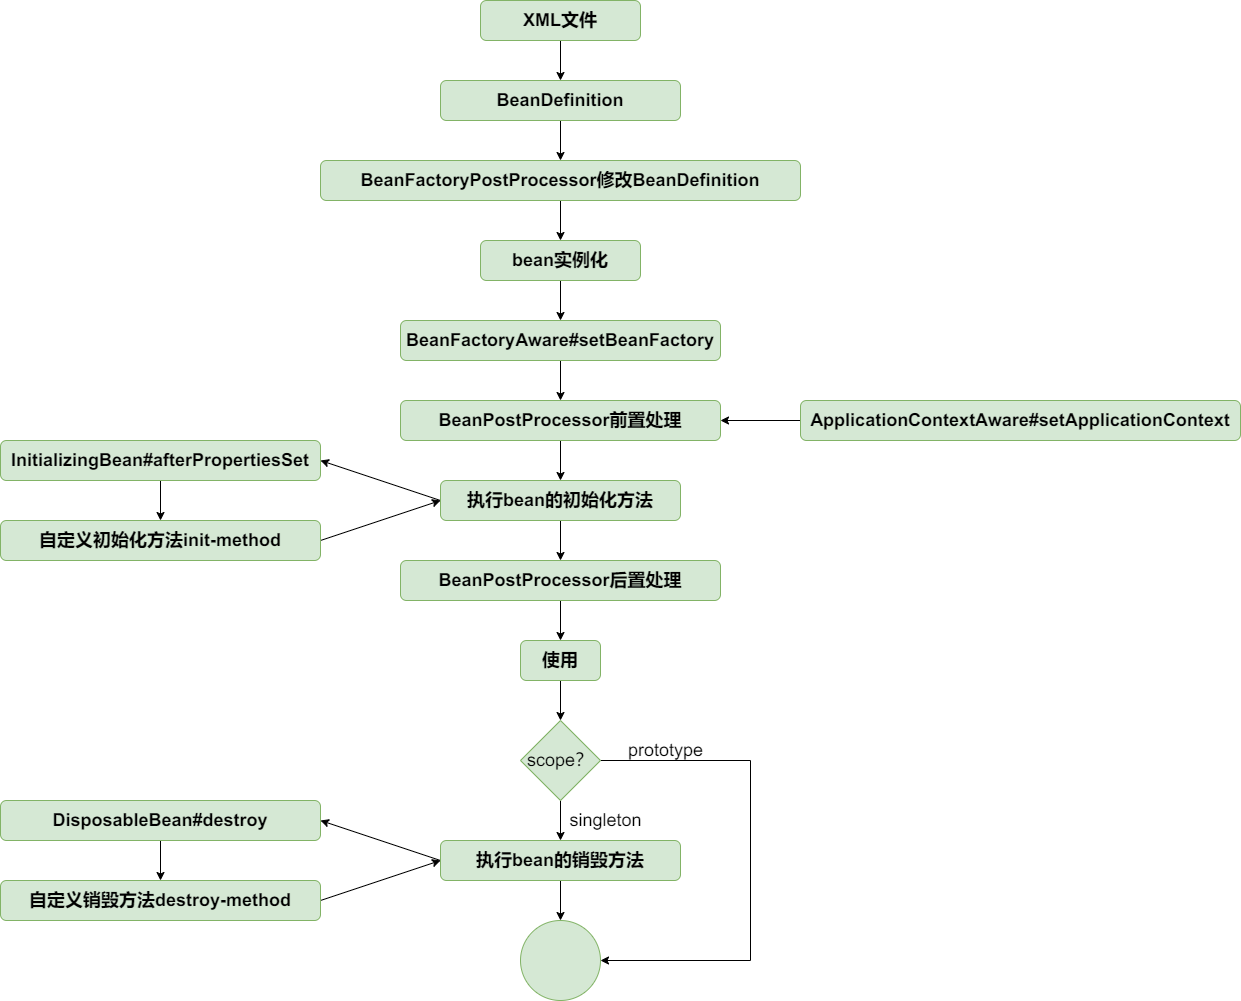
至止,bean的生命周期如下:
测试: prototype-bean.xml
1
2
3
4
5
6
7
8
9
10
11
12
13
14
<?xml version="1.0" encoding="UTF-8"?> <beans xmlns="http://www.springframework.org/schema/beans" xmlns:xsi="http://www.w3.org/2001/XMLSchema-instance" xmlns:context="http://www.springframework.org/schema/context" xsi:schemaLocation="http://www.springframework.org/schema/beans http://www.springframework.org/schema/beans/spring-beans.xsd http://www.springframework.org/schema/context http://www.springframework.org/schema/context/spring-context-4.0.xsd"> <bean id="car" class="org.springframework.test.bean.Car" scope="prototype"> <property name="brand" value="porsche"/> </bean> </beans>
1
2
3
4
5
6
7
8
9
10
11
public class PrototypeBeanTest { @Test public void testPrototype() throws Exception { ClassPathXmlApplicationContext applicationContext = new ClassPathXmlApplicationContext("classpath:prototype-bean.xml"); Car car1 = applicationContext.getBean("car", Car.class); Car car2 = applicationContext.getBean("car", Car.class); assertThat(car1 != car2).isTrue(); } }
FactoryBean FactoryBean是一种特殊的bean,当向容器获取该bean时,容器不是返回其本身,而是返回其FactoryBean#getObject方法的返回值,可通过编码方式定义复杂的bean。
实现逻辑比较简单,当容器发现bean为FactoryBean类型时,调用其getObject方法返回最终bean。当FactoryBean#isSingleton==true,将最终bean放进缓存中,下次从缓存中获取。改动点见AbstractBeanFactory#getBean。
1
2
3
4
5
6
7
8
9
// AbstractBeanFactory#getBean(java.lang.String) public Object getBean(String name) throws BeansException { Object sharedInstance = getSingleton(name); if (sharedInstance != null) { //如果是FactoryBean,从FactoryBean#getObject中创建bean return getObjectForBeanInstance(sharedInstance, name); } ``` ``` }
测试: factory-bean.xml
1
2
3
4
5
6
7
8
9
10
11
12
13
14
<?xml version="1.0" encoding="UTF-8"?> <beans xmlns="http://www.springframework.org/schema/beans" xmlns:xsi="http://www.w3.org/2001/XMLSchema-instance" xmlns:context="http://www.springframework.org/schema/context" xsi:schemaLocation="http://www.springframework.org/schema/beans http://www.springframework.org/schema/beans/spring-beans.xsd http://www.springframework.org/schema/context http://www.springframework.org/schema/context/spring-context-4.0.xsd"> <bean id="car" class="org.springframework.test.common.CarFactoryBean"> <property name="brand" value="porsche"/> </bean> </beans>
1
2
3
4
5
6
7
8
9
10
11
12
13
14
15
16
17
18
19
20
public class CarFactoryBean implements FactoryBean<Car> { private String brand; @Override public Car getObject() throws Exception { Car car = new Car(); car.setBrand(brand); return car; } @Override public boolean isSingleton() { return true; } public void setBrand(String brand) { this.brand = brand; } }
1
2
3
4
5
6
7
8
9
10
11
public class FactoryBeanTest { @Test public void testFactoryBean() throws Exception { ClassPathXmlApplicationContext applicationContext = new ClassPathXmlApplicationContext("classpath:factory-bean.xml"); Car car = applicationContext.getBean("car", Car.class); applicationContext.getBean("car"); assertThat(car.getBrand()).isEqualTo("porsche"); } }
容器事件和事件监听器 ApplicationContext容器提供了完善的事件发布和事件监听功能。
ApplicationEventMulticaster接口是注册监听器和发布事件的抽象接口,AbstractApplicationContext包含其实现类实例作为其属性,使得ApplicationContext容器具有注册监听器和发布事件的能力。在AbstractApplicationContext#refresh方法中,会实例化ApplicationEventMulticaster、注册监听器并发布容器刷新事件ContextRefreshedEvent;在AbstractApplicationContext#doClose方法中,发布容器关闭事件ContextClosedEvent。
1
2
3
4
5
6
7
8
9
10
11
12
13
14
15
public void refresh() throws BeansException { ··· ··· //初始化事件发布者 initApplicationEventMulticaster(); //注册事件监听器 registerListeners(); ··· ··· //发布容器刷新完成事件 finishRefresh(); }
测试: event-and-event-listener.xml
1
2
3
4
5
6
7
8
9
10
11
12
13
14
15
<?xml version="1.0" encoding="UTF-8"?> <beans xmlns="http://www.springframework.org/schema/beans" xmlns:xsi="http://www.w3.org/2001/XMLSchema-instance" xmlns:context="http://www.springframework.org/schema/context" xsi:schemaLocation="http://www.springframework.org/schema/beans http://www.springframework.org/schema/beans/spring-beans.xsd http://www.springframework.org/schema/context http://www.springframework.org/schema/context/spring-context-4.0.xsd"> <bean class="org.springframework.test.common.event.ContextRefreshedEventListener"/> <bean class="org.springframework.test.common.event.CustomEventListener"/> <bean class="org.springframework.test.common.event.ContextClosedEventListener"/> </beans>
1
2
3
4
5
6
7
8
9
10
public class EventAndEventListenerTest { @Test public void testEventListener() throws Exception { ClassPathXmlApplicationContext applicationContext = new ClassPathXmlApplicationContext("classpath:event-and-event-listener.xml"); applicationContext.publishEvent(new CustomEvent(applicationContext)); applicationContext.registerShutdownHook();//或者applicationContext.close()主动关闭容器; } }
观察输出:
1
2
3
org.springframework.test.common.event.ContextRefreshedEventListener org.springframework.test.common.event.CustomEventListener org.springframework.test.common.event.ContextClosedEventListener